Unlike many built-in controls, SwiftUI does not wrap UIGestureRecognizer (or NSGestureRecognizer) but instead restructures its own gesture system. SwiftUI gestures lower the barrier to entry to some extent, but due to the lack of APIs that provide underlying data, developers are severely limited in their ability to customize. In SwiftUI, we cannot have the ability to build a brand new UIGestureRecongnizer. So-called custom gestures are actually just a refactoring of the system’s preset gestures. This article will demonstrate how to customize the desired gesture using native SwiftUI tools through several examples.
Basics
Predefined Gestures
SwiftUI currently provides 5 predefined gestures, which are tap, long press, drag, magnification, and rotation. The call method, such as onTapGesture, is actually a view extension created for convenience.
-
TapGesture
You can set the number of taps (single tap, double tap). It is one of the most frequently used gestures.
-
LongPressGesture
After pressing for a set duration, you can trigger a specified closure.
-
DragGesture
SwiftUI combines pan and swipe into one, providing drag data when the position changes.
-
MagnificationGesture
Two-finger magnification.
-
RotationGesture
Two-finger rotation.
Clicking, long pressing, and dragging only support single finger. SwiftUI does not provide a function to set the number of fingers.
In addition to the gestures provided to developers, SwiftUI actually has a large number of internal (unpublished) gestures for system controls, such as ScrollGesture, _ButtonGesture, etc.
The implementation of the built-in gesture of Button is more complex than TapGesture. In addition to providing more opportunities for invocation, it also supports intelligent processing of the size of the press area (to improve the success rate of finger tapping).
Value
SwiftUI provides different data content according to the type of gesture.
- Click: The data type is Void (In SwiftUI 4.0, the data type is CGPoint, indicating the click position in a specific coordinate space.)
- Long press: The data type is Bool, providing true after the start of the press
- Drag: Provides the most comprehensive data information, including current position, offset, event time, predicted endpoint, predicted offset, etc.
- Zoom: The data type is CGFloat, indicating the amount of zoom
- Rotate: The data type is Angle, indicating the rotation angle
Using the map method, the data provided by the gesture can be converted into other types for easy calling in the future.
Timing
There is no concept of state inside SwiftUI gestures. By setting up closures corresponding to specific timings, gestures will be automatically called at the appropriate time.
-
onEnded
The operation to be executed when the gesture ends.
-
onChanged
The operation to be executed when the value provided by the gesture changes. This is only provided when the Value conforms to Equatable, so TapGesture is not supported.
-
updating
The timing of execution is the same as onChanged. There is no specific convention for Value. Compared to onChanged, it increases the ability to update gesture attributes (GestureState) and get Transactions.
Different gestures have different focuses on timing. Clicking usually only focuses on onEnded; onChanged (or updating) is more important in dragging, scaling, and rotating. Long press is only called when the set duration is met, and then onEnded is called.
GestureState
A property wrapper type specifically designed for SwiftUI gestures, which can drive view updates as a dependency. It differs from State in the following ways:
- It can only be modified in the updating method of the gesture, and is read-only elsewhere in the view.
- When the gesture associated with it (using updating) ends, it automatically restores its content to its initial value.
- The animation state when restoring the initial data can be set through resetTransaction.
Means of Combining Gestures
SwiftUI provides several methods for combining gestures, allowing multiple gestures to be connected and restructured into other types of gestures.
-
simultaneously
Combines one gesture with another to create a new gesture that recognizes both at the same time. For example, combining pinch and rotation gestures to simultaneously scale and rotate an image.
-
sequenced
Connects two gestures so that the second gesture is only recognized after the first gesture succeeds. For instance, connecting a long press and a drag to enable dragging only after a certain amount of time has passed while pressing.
-
exclusively
Merges two gestures, but only one of them can be recognized. The system will prioritize the first gesture.
After combining gestures, the Value type will also change. You can still use map to convert it into a more usable data type.
Definition of Gesture Format
Developers usually create custom gestures within the view, which has less code and is easy to combine with other data in the view. For example, the following code creates a gesture that supports both scaling and rotation in the view:
struct GestureDemo: View {
    @GestureState(resetTransaction: .init(animation: .easeInOut)) var gestureValue = RotateAndMagnify()

    var body: some View {
        let rotateAndMagnifyGesture = MagnificationGesture()
            .simultaneously(with: RotationGesture())
            .updating($gestureValue) { value, state, _ in
                state.angle = value.second ?? .zero
                state.scale = value.first ?? 0
            }

        return Rectangle()
            .fill(LinearGradient(colors: [.blue, .green, .pink], startPoint: .top, endPoint: .bottom))
            .frame(width: 100, height: 100)
            .shadow(radius: 8)
            .rotationEffect(gestureValue.angle)
            .scaleEffect(gestureValue.scale)
            .gesture(rotateAndMagnifyGesture)
    }

    struct RotateAndMagnify {
        var scale: CGFloat = 1.0
        var angle: Angle = .zero
    }
}
Additionally, gestures can also be created as structs that conform to the Gesture protocol, making these defined gestures very suitable for repeated use.
Encapsulating gestures or gesture handling logic into view extensions can further simplify their usage.
To highlight certain aspects of functionality, the demonstration code provided in the following sections may seem verbose. In practice, it can be simplified as needed.
Example 1: Swipe
1.1 Objective
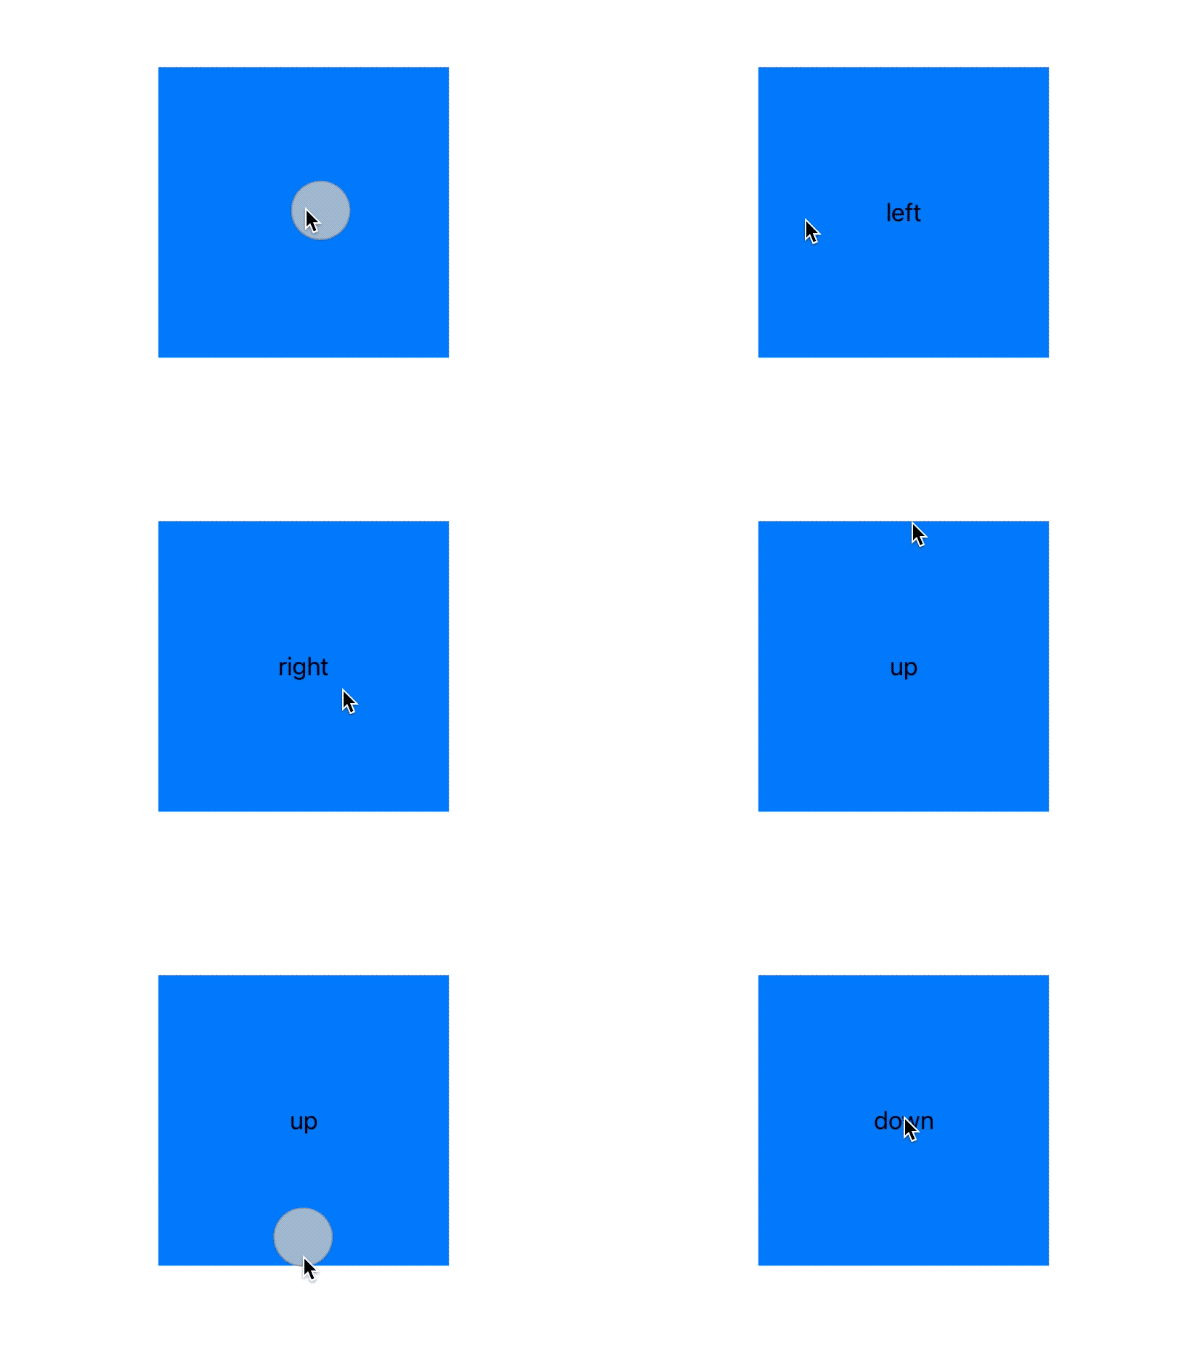
Create a swipe gesture and demonstrate how to create a struct that conforms to the Gesture protocol and convert gesture data.
1.2 Idea
In SwiftUI’s preset gestures, only DragGesture provides data that can be used to determine the direction of movement. The swipe direction is determined based on the offset, and map is used to convert complicated data into simple directional data.
1.3 Implementation
public struct SwipeGesture: Gesture {
    public enum Direction: String {
        case left, right, up, down
    }

    public typealias Value = Direction

    private let minimumDistance: CGFloat
    private let coordinateSpace: CoordinateSpace

    public init(minimumDistance: CGFloat = 10, coordinateSpace: CoordinateSpace = .local) {
        self.minimumDistance = minimumDistance
        self.coordinateSpace = coordinateSpace
    }

    public var body: AnyGesture<Value> {
        AnyGesture(
            DragGesture(minimumDistance: minimumDistance, coordinateSpace: coordinateSpace)
                .map { value in
                    let horizontalAmount = value.translation.width
                    let verticalAmount = value.translation.height

                    if abs(horizontalAmount) > abs(verticalAmount) {
                        if horizontalAmount < 0 { return .left } else { return .right }
                    } else {
                        if verticalAmount < 0 { return .up } else { return .down }
                    }
                }
        )
    }
}

public extension View {
    func onSwipe(minimumDistance: CGFloat = 10,
                 coordinateSpace: CoordinateSpace = .local,
                 perform: @escaping (SwipeGesture.Direction) -> Void) -> some View {
        gesture(
            SwipeGesture(minimumDistance: minimumDistance, coordinateSpace: coordinateSpace)
                .onEnded(perform)
        )
    }
}
1.4 Demo
struct SwipeTestView: View {
    @State var direction = ""
    var body: some View {
        Rectangle()
            .fill(.blue)
            .frame(width: 200, height: 200)
            .overlay(Text(direction))
            .onSwipe { direction in
                self.direction = direction.rawValue
            }
    }
}
1.5 Explanation
- Why use AnyGesture
In the Gesture protocol, a hidden type method _makeGesture needs to be implemented. Currently, Apple has not provided any documentation on how to implement it. Fortunately, SwiftUI provides a default implementation with constraints. When we do not use custom Value types in the struct, SwiftUI can infer Self.Body.Value, and the body can be declared as some Gesture. However, since a custom Value type is used in this example, the body must be declared as AnyGesture<Value> in order to meet the conditions for enabling the default implementation of _makeGesture.
  extension Gesture where Self.Value == Self.Body.Value {
    public static func _makeGesture(gesture: SwiftUI._GraphValue<Self>, inputs: SwiftUI._GestureInputs) -> SwiftUI._GestureOutputs<Self.Body.Value>
  }
1.6 Insufficiencies and Improvement Methods
In this example, factors such as the duration and speed of the gesture movement were not fully considered. The current implementation cannot strictly be considered a true swipe. To achieve a true swipe, the following implementation method can be used:
- Modify the implementation to that of Example 2, using a ViewModifier to wrap the DragGesture
- Use State to record the swipe duration
- In onEnded, only call the user’s closure and pass the direction if the speed, distance, deviation, and other requirements are met.
Example 2: Timer Press
2.1 Objective
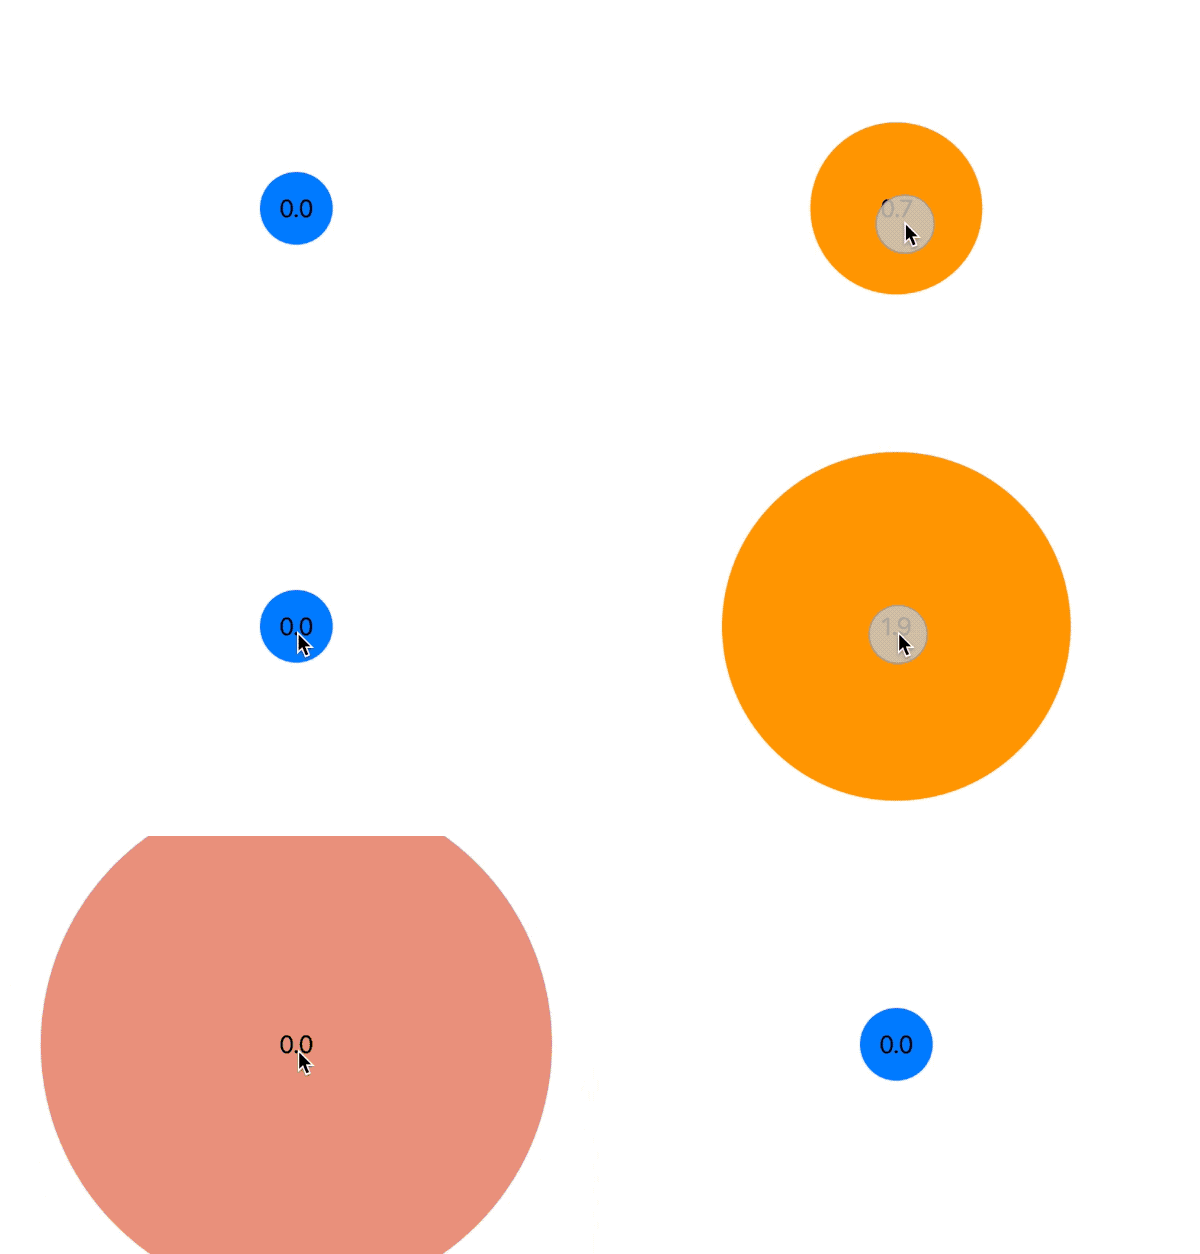
To implement a press gesture that can record the duration. During the press, a callback similar to onChanged can be called based on a specified time interval. This example demonstrates how to wrap gestures with view modifiers and how to use GestureState.
2.2 Idea
Use a timer to pass the current press duration to a closure after a specified time interval. Use GestureState to save the start time of the press. After the press ends, the start time of the last press will be automatically cleared by the gesture.
2.3 Implementation
public struct PressGestureViewModifier: ViewModifier {
    @GestureState private var startTimestamp: Date?
    @State private var timePublisher: Publishers.Autoconnect<Timer.TimerPublisher>
    private var onPressing: (TimeInterval) -> Void
    private var onEnded: () -> Void

    public init(interval: TimeInterval = 0.016, onPressing: @escaping (TimeInterval) -> Void, onEnded: @escaping () -> Void) {
        _timePublisher = State(wrappedValue: Timer.publish(every: interval, tolerance: nil, on: .current, in: .common).autoconnect())
        self.onPressing = onPressing
        self.onEnded = onEnded
    }

    public func body(content: Content) -> some View {
        content
            .gesture(
                DragGesture(minimumDistance: 0, coordinateSpace: .local)
                    .updating($startTimestamp, body: { _, current, _ in
                        if current == nil {
                            current = Date()
                        }
                    })
                    .onEnded { _ in
                        onEnded()
                    }
            )
            .onReceive(timePublisher, perform: { timer in
                if let startTimestamp = startTimestamp {
                    let duration = timer.timeIntervalSince(startTimestamp)
                    onPressing(duration)
                }
            })
    }
}

public extension View {
    func onPress(interval: TimeInterval = 0.016, onPressing: @escaping (TimeInterval) -> Void, onEnded: @escaping () -> Void) -> some View {
        modifier(PressGestureViewModifier(interval: interval, onPressing: onPressing, onEnded: onEnded))
    }
}
2.4 Demo
struct PressGestureView: View {
    @State var scale: CGFloat = 1
    @State var duration: TimeInterval = 0
    var body: some View {
        VStack {
            Circle()
                .fill(scale == 1 ? .blue : .orange)
                .frame(width: 50, height: 50)
                .scaleEffect(scale)
                .overlay(Text(duration, format: .number.precision(.fractionLength(1))))
                .onPress { duration in
                    self.duration = duration
                    scale = 1 + duration * 2
                } onEnded: {
                    if duration > 1 {
                        withAnimation(.easeInOut(duration: 2)) {
                            scale = 1
                        }
                    } else {
                        withAnimation(.easeInOut) {
                            scale = 1
                        }
                    }
                    duration = 0
                }
        }
    }
}
2.5 Explanation
- The restoration time of GestureState data is before onEnded, and in onEnded, startTimestamp has already been restored to nil
- DragGesture is still the best implementation carrier. TapGesture and LongPressGesture will automatically terminate the gesture after meeting the triggering conditions, and cannot support arbitrary durations
2.6 Shortcomings and Improvement Methods
The current solution does not provide a setting for offset limitation of the pressed position similar to LongPressGesture. In addition, the total duration of this press has not been provided in onEnded.
- In updating, judge the offset value. If the offset of the touch point exceeds the specified range, the timing will be interrupted. Call the user-provided onEnded closure in updating and mark it.
- In the onEnded of the gesture, if the user-provided onEnded closure has been called, it will not be called again.
- Replace GestureState with State, so that the total duration can be provided in the onEnded of the gesture. You need to write the State data recovery code yourself.
- Since State is used instead of GestureState, logical judgment can be moved from updating to onChanged.
Example 3: Click with Location Information
SwiftUI 4.0 introduces a new gesture - SpatialTapGesture, which can directly obtain the click position. onTapGesture has also been improved, and the value in onChange and onEnd will represent the click position in a specific coordinate space (CGPoint).
3.1 Objective
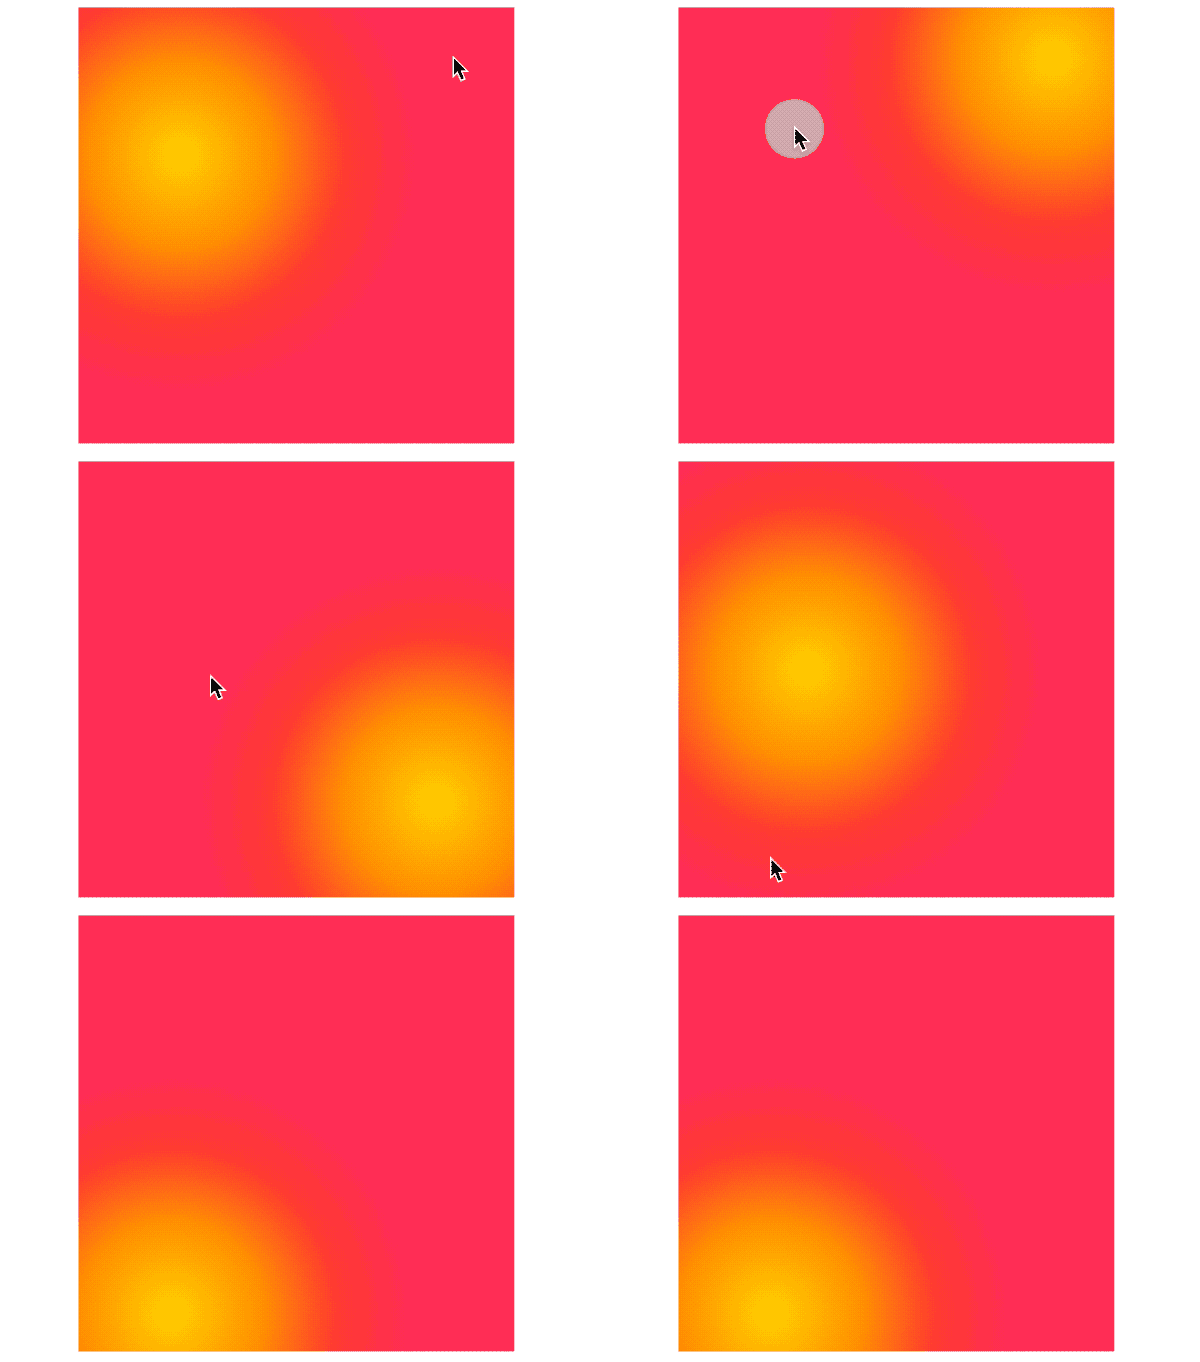
To implement a click gesture that provides touch location information (supports setting the number of clicks). This example mainly demonstrates the usage of simultaneously and how to choose the appropriate callback timing (onEnded).
3.2 Approach
The response of the gesture should be exactly the same as TapGesture. Use simultaneously to combine the two gestures, obtain position data from DragGesture and exit from TapGesture.
3.3 Implementation
public struct TapWithLocation: ViewModifier {
    @State private var locations: CGPoint?
    private let count: Int
    private let coordinateSpace: CoordinateSpace
    private var perform: (CGPoint) -> Void

    init(count: Int = 1, coordinateSpace: CoordinateSpace = .local, perform: @escaping (CGPoint) -> Void) {
        self.count = count
        self.coordinateSpace = coordinateSpace
        self.perform = perform
    }

    public func body(content: Content) -> some View {
        content
            .gesture(
                DragGesture(minimumDistance: 0, coordinateSpace: coordinateSpace)
                    .onChanged { value in
                        locations = value.location
                    }
                    .simultaneously(with:
                        TapGesture(count: count)
                            .onEnded {
                                perform(locations ?? .zero)
                                locations = nil
                            }
                    )
            )
    }
}

public extension View {
    func onTapGesture(count: Int = 1, coordinateSpace: CoordinateSpace = .local, perform: @escaping (CGPoint) -> Void) -> some View {
        modifier(TapWithLocation(count: count, coordinateSpace: coordinateSpace, perform: perform))
    }
}
3.4 Demo
struct TapWithLocationView: View {
    @State var unitPoint: UnitPoint = .center
    var body: some View {
        Rectangle()
            .fill(RadialGradient(colors: [.yellow, .orange, .red, .pink], center: unitPoint, startRadius: 10, endRadius: 170))
            .frame(width: 300, height: 300)
            .onTapGesture(count:2) { point in
                withAnimation(.easeInOut) {
                    unitPoint = UnitPoint(x: point.x / 300, y: point.y / 300)
                }
            }
    }
}
3.5 Explanation
- When the minimumDistance of DragGesture is set to 0, the first data produced by it is guaranteed to be earlier than the activation time of TapGesture (count:1)
- In
simultaneously, there are threeonEndedoccasions in total. TheonEndedof gesture 1, theonEndedof gesture 2, and theonEndedof the merged gesture. In this example, we choose to call the user’s closure in theonEndedof TapGesture.
Conclusion
Currently, SwiftUI gestures are at a low threshold of use, but their ability limit is insufficient. Using only SwiftUI’s native means cannot achieve very complex gesture logic. In the future, we will study issues related to the priority between gestures, the selective invalidation using GestureMask, and how to work with UIGestureRecognizer to create complex gestures through other articles.