In this article, we will explore the most common scenario in Core Data with CloudKit applications—synchronizing the local database with the iCloud private database. We will unfold this topic on several levels:
- Direct support for
Core Data with CloudKitin new projects - Considerations for creating syncable
Model - Adding
Host in CloudKitsupport to existingCore Dataprojects - Selective data synchronization
The development environment used in this article is
Xcode 12.5. For the concept of a private database, refer to Core Data with CloudKit: The Basics. To practically follow the contents of this article, you need an Apple Developer Program account.
Quick Guide
To enable Core Data with CloudKit in an application, just follow these steps:
- Use
NSPersistentCloudKitContainer - Add
CloudKitsupport in theSigning & Capabilitiesof theProject Target - Create or specify a
CloudKit containerfor the project - Add
backgroundsupport in theSigning & Capabilitiesof theProject Target - Configure
NSPersistentStoreDescriptionandviewContext - Check if the
Data Modelmeets synchronization requirements
Direct Support for Core Data with CloudKit in New Projects
In recent years, Apple has continuously improved the Core Data template in Xcode. Using the built-in template to create a new project with support for Core Data with CloudKit is the most convenient way to start.
Creating a New Xcode Project
Create a new project, check Use Core Data and Host in CloudKit (earlier versions as Use CloudKit) in the project settings, and set the development team (Team).

After setting the save location, Xcode will generate project documentation with Core Data with CloudKit support using the preset template.
Xcode may remind you of errors in the new project code. If it’s bothersome, just build the project to cancel the error prompt (generate NSManagedObject Subclass).
Next, we operate step by step according to the Quick Guide.
Setting up PersistentCloudKitContainer
Persistence.swift is the Core Data Stack created by the official template. Since Host in CloudKit was chosen during project creation, the template code has already used NSPersistentCloudKitContianer instead of NSPersistentContianer, so no modifications are needed.
let container: NSPersistentCloudKitContainerEnabling CloudKit
Click the corresponding Target in the project and choose Signing & Capabilities. Click +Capability and find icloud to add CloudKit support.


Check CloudKit. Click +, and enter the CloudKit container name. Xcode will automatically add iCloud. before your CloudKit container name. The name of the container usually adopts the reverse domain name method and does not need to be consistent with the project or BundleID. If the development team is not configured, you cannot create a container.

After adding CloudKit support, Xcode automatically adds Push Notifications functionality, which we discussed in the previous article.
Enabling Background Notifications
Continue clicking +Capability, search for background and add it, check Remote notifications.

This feature allows your application to respond to silent notifications pushed when cloud data content changes.
Configuring NSPersistentStoreDescription and viewContext
Check the current .xcdatamodeld file in the project. There’s only one default configuration Default in CONFIGURATIONS. Clicking on it shows that Used with CloudKit has been checked.

If the developer has not customized `
Configurationin theData Model Editor, and if Used with CloudKitis checked,Core Datawill use the selectedCloudkit containerto setcloudKitContainerOptions. Therefore, in the current Persistence.swiftcode, we do not need to make any additional settings forNSPersistentStoreDescription(we will introduce how to setNSPersistentStoreDescription` in later chapters).
Configure the context in Persistence.swift as follows:
container.loadPersistentStores(completionHandler: { (storeDescription, error) in
       if let error = error as NSError? {
              ...
                fatalError("Unresolved error \(error), \(error.userInfo)")
        }
})
// Add the following code
container.viewContext.automaticallyMergesChangesFromParent = true
container.viewContext.mergePolicy = NSMergeByPropertyObjectTrumpMergePolicy
do {
      try container.viewContext.setQueryGenerationFrom(.current)
} catch {
     fatalError("Failed to pin viewContext to the current generation:\(error)")
}
container.viewContext.automaticallyMergesChangesFromParent = true allows the view context to automatically merge data synced (imported) from the server. Views using @FetchRequest or NSFetchedResultsController can reflect data changes promptly in the UI.
container.viewContext.mergePolicy = NSMergeByPropertyObjectTrumpMergePolicy sets the merge conflict strategy. If this property is not set, Core Data will default to using NSErrorMergePolicy as the conflict resolution strategy (do not handle any conflicts, directly report an error), which will cause iCloud data to not merge correctly into the local database.
Core Data has four preset merge conflict strategies:
-
NSMergeByPropertyStoreTrumpMergePolicy
Compare by property, if both persistent and in-memory data change and conflict, persistent data wins
-
NSMergeByPropertyObjectTrumpMergePolicy
Compare by property, if both persistent and in-memory data change and conflict, in-memory data wins
-
NSOverwriteMergePolicy
In-memory data always wins
-
NSRollbackMergePolicy
Persistent data always wins
For scenarios like Core Data with CloudKit, NSMergeByPropertyObjectTrumpMergePolicy is usually chosen.
setQueryGenerationFrom(.current) is something that only recently appeared in Apple’s documentation and examples. Its purpose is to avoid instability that might occur due to inconsistent data changes made by the application during data import. Although I have hardly encountered this situation in my more than two years of use, I still recommend everyone to add context snapshot locking in the code to improve stability.
Until
Xcode 13 beta4, Apple still has not added context settings in the presetCore Data with CloudKittemplate, which makes importing data with the original template behave differently from expectations, not very friendly for beginners.
Checking if Data Model Meets Synchronization Requirements
The Data Model in the template project is very simple, with only one Entity and a single Attribute, and does not require adjustments for now. The synchronization rules applicable to Data Model will be detailed in the next chapter.

Modifying ContentView.swift
Reminder: The ContentView.swift generated by the template is incomplete and needs modifications to display correctly.
    var body: some View {
        NavigationView { // Adding NavigationView
            List {
                ForEach(items) { item in
                    Text("Item at \(item.timestamp!, formatter: itemFormatter)")
                }
                .onDelete(perform: deleteItems)
            }
            .toolbar {
                HStack { // Adding HStack
                    EditButton()
                    Button(action: addItem) {
                        Label("Add Item", systemImage: "plus")
                    }
                }
            }
        }
    }
After modification, the Toolbar buttons can be displayed correctly.
Thus, we have completed a project supporting Core Data with CloudKit.
Running
Set up and log into the same iCloud account on either a simulator or a real device, as only the same account can access the same iCloud private database.
The animation below shows the effect of running on a real device (screen mirrored via Airplay) and a simulator.

The video is edited, and the synchronization time is usually about 15-20 seconds.
Operations from the simulator (adding, deleting) are usually reflected on the real device within about 15-20 seconds; however, operations from the real device require switching the simulator to the background and then back to the foreground to reflect changes in the simulator (since the simulator does not support silent notification responses). If testing between two simulators, similar operations need to be performed on both ends.
Apple’s documentation describes the synchronization + distribution time as not exceeding 1 minute, and in actual use, it’s usually around 10-30 seconds. It supports batch data updates, so there’s no need to worry about the efficiency of large data updates.
When data changes, a lot of debugging information will be generated in the console. Future articles will cover more about debugging.
Considerations for Creating Syncable Models
To perfectly transfer records between Core Data and CloudKit databases, it’s best to have a certain understanding of both data structure types. For specifics, please refer to Core Data with CloudKit (Part 1) - The Basics.
CloudKit Schema does not support all features and configurations of Core Data Model. Therefore, when designing a syncable Core Data project, please be aware of the following limitations and ensure you have created a compatible data model.
Entities
CloudKit Schemadoes not supportCore Data’s unique constraints (Unique constraints)
Core Data’s Unique constraints require support from SQLite, and since CloudKit itself is not a relational database, it’s unsurprising it doesn’t support this.
CREATE UNIQUE INDEX Z_Movie_UNIQUE_color_colors ON ZMOVIE (ZCOLOR COLLATE BINARY ASC, ZCOLORS COLLATE BINARY ASC)
Attributes
- Attributes that are
non-optionalandwithout default valuesare not allowed. Allowed: Optional, with default value, Optional + with default value

The above image shows attributes that are non-Optional and without a Default Value, which is an incompatible form and will cause Xcode to report an error.
- Does not support
Undefinedtype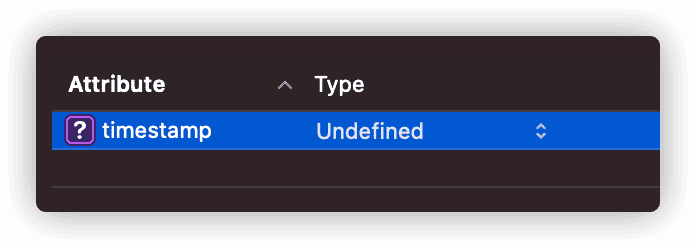

Relationships
- All relationships must be set as optional (
Optional) - All relationships must have an inverse (
Inverse) relationship - Does not support
Denydelete rule - Does not support
Orderedrelationship
CloudKit also has a type of object similar to Core Data’s relationship type—CKReference. However, this object can only support up to 750 records and cannot meet the needs of most Core Data application scenarios. `
CloudKitconvertsCore Datarelationships into correspondingRecord Name(UUID string form) one by one. This leads toCloudKit possibly not saving relationship changes atomically (atomically`), hence the stricter restrictions on defining relationships.
In everyday use of Core Data, most relationship definitions still meet the above requirements.
Configurations
- An
Entitymust not establish arelationshipwith entities in otherConfigurations
I find this limitation in the official documentation somewhat puzzling, as developers typically do not establish relationships between entities in two different Configurations, even without network synchronization. If a relationship is needed, they usually opt to create Fetched Properties.

When
CloudKitsynchronization is enabled, if theModeldoes not meet the synchronization compatibility conditions,Xcodewill report an error and remind the developer. When changing an existing project to supportCore Data with CloudKit, some modifications to the code may be necessary.
Adding Host in CloudKit Support to Existing Core Data Projects
With the foundation of the template project, upgrading a Core Data project to support Core Data with CloudKit is quite easy:
- Replace
NSPersistentContainerwithNSPersistentCloudKitContainer - Add
CloudKitandbackgroundcapabilities and add aCloudKit container - Configure the context
Two points still need reminding:
CloudKit Container Authentication Failure
When adding a CloudKit container, sometimes it may fail to authenticate, especially when adding an already created container.
CoreData: error: CoreData+CloudKit: -[NSCloudKitMirroringDelegate recoverFromPartialError:forStore:inMonitor:]block_invoke(1943): <NSCloudKitMirroringDelegate: 0x282430000>: Found unknown error as part of a partial failure: <CKError 0x28112d500: "Permission Failure" (10/2007); server message = "Invalid bundle ID for container"; uuid = ; container ID = "iCloud.Appname">The solution is to log in to the developer account -> Certificates, Identifiers & Profiles -> Identifiers App IDs, select the corresponding BundleID, configure iCloud, click Edit, and reconfigure the container.

Using a Custom NSPersistentStoreDescription
Some developers prefer to customize NSPersistentStoreDescription (even if there’s only one Configuration). In this case, you need to explicitly set cloudKitContainerOptions for NSPersistentStoreDescription, for example:
let cloudStoreDescription = NSPersistentStoreDescription(url: cloudStoreLocation)
cloudStoreDescription.configuration = "Cloud"

cloudStoreDescription.cloudKitContainerOptions = NSPersistentCloudKitContainerOptions(containerIdentifier: "your.containerID")
Even if you do not set the Configuration in the Model Editor as Used with CloudKit, the network synchronization function is still effective. The biggest benefit of checking Used with CloudKit is that Xcode will check if your Model is compatible with CloudKit.
Selective Data Synchronization
In practical applications, there are scenarios where we want to selectively synchronize data. By defining multiple Configurations in the Data Model Editor, we can control data synchronization.
Configuring Configuration is very simple, just drag the Entity into it.
Placing Different Entities in Different Configurations
Suppose the following scenario: we have an Entity — Catch, used for local data caching, and its data does not need to be synced to iCloud.
Apple’s official documentation and other materials discussing Configuration mostly focus on scenarios like the one above.
We create two Configurations:
- local—
Catch - cloud— other
Entitiesthat need synchronization
Use code similar to the following:
let cloudURL = FileManager.default.urls(for: .documentDirectory, in: .userDomainMask).first!
              .appendingPathComponent("cloud.sqlite")
let localURL = FileManager.default.urls(for:.documentDirectory, in:.userDomainMask).first!
              .appendingPathComponent("local.sqlite")

let cloudDesc = NSPersistentStoreDescription(url: cloudURL)
cloudDesc.cloudKitContainerOptions = NSPersistentCloudKitContainerOptions(containerIdentifier: "your.cloudKit.container")
cloudDesc.configuration = "cloud"

let localDesc = NSPersistentStoreDescription(url: localURL)
localDesc.configuration = "local"

container.persistentStoreDescriptions = [cloudDesc,localDesc]
Only data of Entities in the Configuration cloud will be synced to iCloud.
We cannot create relationships between Entities across Configurations. If necessary, Fetched Properties can be used to achieve a limited approximation.
Placing the Same Entity in Different Configurations
If you want to control the synchronization
of data for the same Entity (partial synchronization), the following solution can be used.
Scenario: Suppose there is an Entity — Movie, and for whatever reason, you only want to sync part of its data.
-
Add an
AttributetoMovie—local:Bool(local data istrue, sync data isfalse) -
Create two
Configurations—cloud,local, and addMovieto bothConfigurations -
Use the same code as above, adding two
DescriptionsinNSPersistentCloudKitContainerWhen fetching
Movie,NSPersistentCoordinatorwill automatically merge and handleMovierecords from bothStores. However, when writing aMovieinstance, the coordinator will only write the instance to theDescriptionthat includesMoviefirst, so pay special attention to the order of addition.For example,
container.persistentStoreDescriptions = [cloudDesc, localDesc], a newMovieincontainer.viewContextwill be written tocloud.sqlite -
Create an
NSPersistentContainernamedlocalContainer, containing onlylocalDesc(multi-container solution) -
Enable
Persistent History TrackingonlocalDesc -
Use
localContainerto create contexts to writeMovieinstances (instances will only be saved locally and not synced over the network) -
Handle
NSPersistentStoreRemoteChangenotifications to merge data written fromlocalContainerinto thecontainer’sviewContext
This solution requires the use of Persistent History Tracking. More information can be found in my other article Using Persistent History Tracking in CoreData.
Conclusion
In this article, we discussed how to synchronize a local database with the iCloud private database.
In the next article, let’s explore how to use the CloudKit dashboard. Let’s understand Core Data with CloudKit from another perspective.