Most beginners are amazed at the ease with which SwiftUI can achieve various animation effects, but after a period of use, they will find that SwiftUI’s animation is not as easy to control as it seems. Developers often face questions such as: how to animate, how to animate, what can be animated, why not animate, why animate like this, and how to prevent animation, etc. The main reason for these problems is the lack of in-depth understanding of SwiftUI’s animation processing logic. This article will try to introduce the animation mechanism of SwiftUI to help you better learn and master SwiftUI’s animation and create satisfactory interactive effects.
Before reading this article, readers should have experience in programming animations in SwiftUI or have a certain understanding of the basic usage of SwiftUI animation. You can get the full code of this article here.
What are animations in SwiftUI?
SwiftUI uses a declarative syntax to describe UI presentation in different states, including animations. According to the official documentation, animations in SwiftUI are defined as creating smooth transitions from one state to another.
In SwiftUI, we cannot command a view to move from one position to another. To achieve this effect, we need to declare the position of the view in state A and state B. When the state changes from A to B, SwiftUI will use the specified algorithm function to provide the data required for generating smooth transitions for specific components (if the component is animatable).
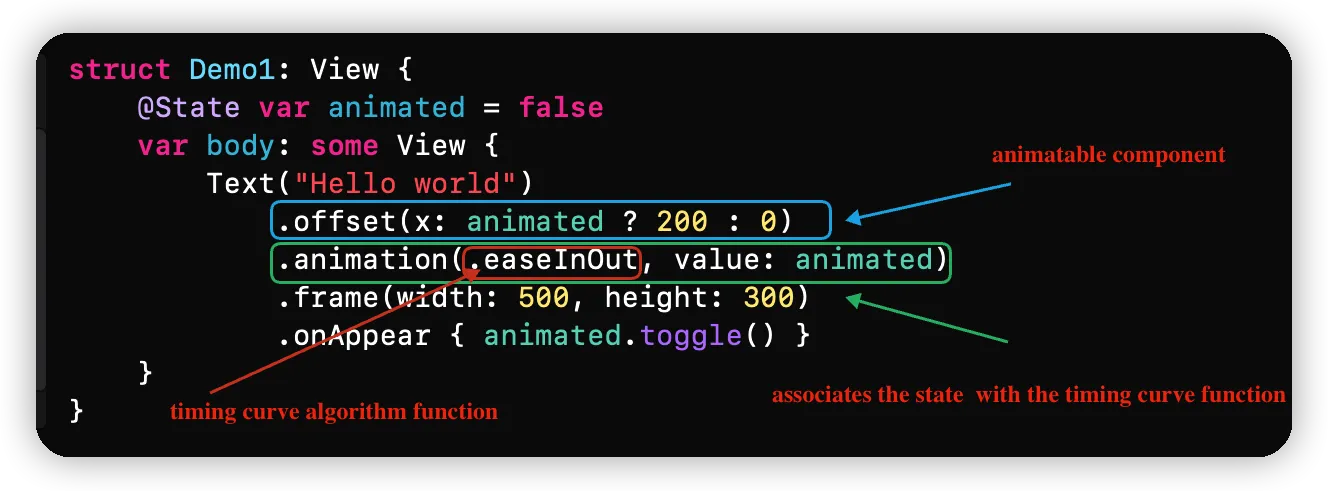
To implement an animation in SwiftUI, we need the following three elements:
- A timing curve algorithm function
- A declaration that associates the state (specific dependency) with the timing curve function
- An animatable component that depends on the state (specific dependency)
Confusing Animation Naming
Timing Curve Functions
SwiftUI has given a confusing name to timing curve algorithm functions - Animation. Perhaps naming it Timing Curve or Animation Curve would be more appropriate (like CAMediaTimingFunction in Core Animation).
This function defines the rhythm of the animation as a timing curve, transforming the starting data to the ending data along the timing curve.
Text("Hello world")
    .animation(.linear(duration: 0.3), value: startAnimation)
    .opacity(startAnimation ? 0 : 1)
The time series curve function (Animation) linear(duration:0.3) means that the data will undergo linear transformation (in this example, from 0 to 1) in 0.3 seconds.


Values corresponding to the timing curve function (Animation) easeInOut(duration:0.3):


The role of the time series function is only to perform interpolation and transformation on data, and how to use the interpolated data is the responsibility of the animatable component.
VectorArithmetic
Only data types that conform to the VectorArithmetic protocol can be applied to time series functions. SwiftUI provides us with several out-of-the-box data types, such as Float, Double, CGFloat, etc.
Text("Hello world")
    .animation(.linear(duration: 0.3), value: startAnimation)
    .opacity(startAnimation ? 0 : 1) // Double type, conforms to VectorArithmetic protocol
Other data types can also provide animation data for animatable components by implementing the requirements of the VectorArithmetic protocol.
Majid’s The magic of Animatable values in SwiftUI shows how to make custom types conform to the VectorArithmetic protocol.
Associating Time-Series Curve Functions with States
Only by associating time-series curve functions (Animation) with one or more dependencies in some form, SwiftUI will generate interpolation data for animations when the state (the associated dependency) changes. The ways of association include the view modifier “animation” or the global function “withAnimation”.
The animation anomalies in SwiftUI (not meeting developers’ expectations) are often related to incorrect association methods or association positions.
Place the animation modifier in the correct position
Code 1:
@State var animated = false

VStack {
    Text("Hello world")
        .offset(x: animated ? 200 : 0)
        .animation(.easeInOut, value: animated) // The scope of the animation modifier is the current view hierarchy and its subviews

    Text("Fat")
        .offset(x: animated ? 200 : 0)
}
Code 2:
VStack {
    Text("Hello world")
        .offset(x: animated ? 200 : 0)

    Text("Fat")
        .offset(x: animated ? 200 : 0)
}
.animation(.easeInOut, value: animated)
The difference in the position of animation in the above two code snippets leads to differences in the behavior of the animation when its associated dependency (animated) changes. In code snippet one, only “Hello world” produces a smooth animation, while in code snippet two, both “Hello world” and “Fat” produce a smooth animation.
Like all SwiftUI view modifiers, the position of the modifier in the code determines its scope and target. The animation modifier only affects the view hierarchy it is in and its child nodes.
Neither of the above code snippets is right or wrong. In some scenarios, we may need all content dependent on a certain item (state) to produce a smooth animation when it changes (like in code snippet two), while in other scenarios, we may only need some content to produce a smooth animation (like in code snippet one). By adjusting the position of animation, we can achieve the desired effect.
Using animation version with specific dependencies only
SwiftUI provides two versions of the animation modifier:
// Version 1, without specifying specific dependencies
func animation(_ animation: Animation?) -> some View

// Version 2, specifying specific dependencies, as used in the previous code
func animation<V>(_ animation: Animation?, value: V) -> some View where V : Equatable
The first way has been deprecated in SwiftUI 3.0 and was one of the culprits causing animation issues in earlier versions of SwiftUI. This version of animation associates with all dependencies of the view hierarchy and its sub-nodes. Any change in dependencies in the view or its sub-nodes will satisfy the conditions for interpolation calculation and the animated data will be propagated to all animatable components within the scope (the view and its sub-nodes).
For example, because the animation in the code below does not specify a specific dependency, when the button is clicked, both the position and color will produce a smooth animation.
struct Demo2: View {
    @State var x: CGFloat = 0
    @State var red = false
    var body: some View {
        VStack {
            Spacer()
            Circle()
                .fill(red ? .red : .blue)
                .frame(width: 30, height: 30)
                .offset(x: x)
                .animation(.easeInOut(duration: 1)) // associates both x and red dependencies
//                .animation(.easeInOut(duration: 1), value: x)  // recommended to use separate associations
//                .animation(.easeInOut(duration: 1), value: red)

            Spacer()
            Button("Animate") {  // changes the values of two dependencies in the closure
                if x == 0 {
                    x = 100
                } else {
                    x = 0
                }
                red.toggle()
            }
        }
        .frame(width: 500, height: 300)
    }
}
By using the animation<V>(_ animation: Animation?, value: V) version, we can make only one of the position or color produce a smooth animation. When modifying multiple dependencies at once, animation(_ animation: Animation?) is prone to unnecessary animations, which is the main reason it has been deprecated.
In this example, using withAnimation can achieve the same effect by modifying specific dependencies within the closure of withAnimation to achieve separate animation control.
struct Demo2: View {
    @State var x: CGFloat = 0
    @State var red = false
    var body: some View {
        VStack {
            Spacer()

            Circle()
                .fill(red ? .red : .blue)
                .frame(width: 30, height: 30)
                .offset(x: x)
            Spacer()
            Button("Animate") {
                if x == 0 {
                    x = 100
                } else {
                    x = 0
                }
                withAnimation(.easeInOut(duration: 1)) { // Only color will transition smoothly
                    red.toggle()
                }
            }
        }
        .frame(width: 500, height: 300)
    }
}
Associate different timing curve functions with different dependencies
Observant friends may notice that in the previous text, when correlating time sequence curve functions, I used the term “dependency” instead of “state”. This is because the state of the view is the overall presentation of all its dependencies. witAnimation allows us to set different time sequence curve functions for different dependencies of the same animatable widget.
struct Demo4: View {
    @State var x: CGFloat = 0
    @State var y: CGFloat = 0
    var body: some View {
        VStack {
            Spacer()
            Circle()
                .fill(.orange)
                .frame(width: 30, height: 30)
                .offset(x: x, y: y) // x and y are associated with different time sequence curve functions
            Spacer()
            Button("Animate") {
                withAnimation(.linear) {
                    if x == 0 {
                        x = 100
                    }
                    else {
                        x = 0
                    }
                }
                withAnimation(.easeInOut) {
                    if y == 0 { y = 100 } else { y = 0 }
                }
            }
        }
        .frame(width: 500, height: 500)
    }
}
Because the x and y in offset(x: x, y: y) are associated with different timing curve functions through withAnimation, the motion of the horizontal and vertical axes is different during the animation (x is linear, y is eased in and out).
Currently,
animation<V>(_ animation: Animation?, value: V)does not support associating different timing curve functions with different dependencies of the same animatable component.
In addition to associating different types of timing curve functions, SwiftUI also allows associating timing curve functions with different durations. When different dependencies of the same animatable component are associated with functions of different durations (with different durations or repeatForever enabled), the interpolation calculation logic will become more complex, and different combinations will have different results. Use with caution.
Button("Animate") {
    withAnimation(.linear) {
        if x == 0 { x = 100 } else { x = 0 }
    }
    withAnimation(.easeInOut(duration: 1.5)) {
        if y == 0 { y = 100 } else { y = 0 }
    }
}
Use withAnimation with caution
In SwiftUI, when there is no animation<V>(_ animation: Animation?, value: V) modifier provided (associated with specific dependent properties), withAnimation may be a better choice than animation(_ animation: Animation?). At least it can explicitly associate specific dependent properties with timing curve functions.
However, now unless necessary (such as the need to associate different timing curve functions), animation<V>(_ animation: Animation?, value: V) should be preferred. This is because although withAnimation can specify dependent properties, it lacks the code location dimension of animation(_ animation: Animation?, value: V). withAnimation will affect all views associated with the dependent properties in the display. For example, it is difficult to achieve the effect of code one with withAnimation.
Additionally, it should be noted that when using withAnimation, the dependencies must be explicitly included in the closure, otherwise withAnimation will not work. For example:
struct Demo3: View {
    @State var items = (0...3).map { $0 }
    var body: some View {
        VStack {
            Button("In withAnimation") {
                withAnimation(.easeInOut) {
                    items.append(Int.random(in: 0...1000))
                }
            }
            Button("Not in withAnimation") { // Using the Array extension method
                items.appendWithAnimation(Int.random(in: 0...1000), .easeInOut)
            }
            List {
                ForEach(items, id: \\.self) { item in
                    Text("\\(item)")
                }
            }
            .frame(width: 500, height: 300)
        }
    }
}

extension Array {
    mutating func appendWithAnimation(_ newElement: Element, _ animation: Animation?) {
        withAnimation(animation) {
            append(newElement)
        }
    }
}
Although withAnimation is used in the Array extension method appendWithAnimation, the SwiftUI animation mechanism is not activated because the closure of withAnimation does not include specific dependencies.
Make your view elements animatable
Associating timing curve functions with specific dependencies only completes the step of setting animation activation conditions (when specific dependencies change) and specifying interpolation algorithms. As for how to use this animation data (interpolation data) to generate animations, it is determined by the animatable components associated with specific dependencies.
By adhering to the Animatable protocol, View or ViewModifier can acquire the ability to obtain animation data (AnimatableModifier has been deprecated). Many of SwiftUI’s official components have already met this protocol, such as offset, frame, opacity, fill, etc.
The requirements of the Animatable protocol are very simple, just implement a computed property animatableData.
public protocol Animatable {

    /// The type defining the data to animate.
    associatedtype AnimatableData : VectorArithmetic

    /// The data to animate.
    var animatableData: Self.AnimatableData { get set }
}
Please note that the type of animatableData specified in the protocol must conform to the VectorArithmetic protocol. This is because only types that conform to the VectorArithmetic protocol can be interpolated by timing curve functions.
When the dependencies associated with an animatable component change, SwiftUI calculates the interpolation using the specified timing curve function and continues to call the animatableData property of the animatable component associated with the dependency.
struct AnimationDataMonitorView: View, Animatable {
    static var timestamp = Date()
    var number: Double
    var animatableData: Double { // When rendering, SwiftUI detects that this view is Animatable and continues to call animableData based on the values provided by the timing curve function after the state has changed.
        get { number }
        set { number = newValue }
    }

    var body: some View {
        let duration = Date().timeIntervalSince(Self.timestamp).formatted(.number.precision(.fractionLength(2)))
        let currentNumber = number.formatted(.number.precision(.fractionLength(2)))
        let _ = print(duration, currentNumber, separator: ",")

        Text(number, format: .number.precision(.fractionLength(3)))
    }
}

struct Demo: View {
    @State var startAnimation = false
    var body: some View {
        VStack {
            AnimationDataMonitorView(number: startAnimation ? 1 : 0) // Declare the two states
                .animation(.linear(duration: 0.3), value: startAnimation) // Associate dependencies and timing curve functions
            Button("Show Data") {
                AnimationDataMonitorView.timestamp = Date()
                startAnimation.toggle() // Change dependencies
            }
        }
        .frame(width: 300, height: 300)
    }
}
The above code clearly shows this process.
Declaration Process:
- Specify the timing curve function - linear
- Associate the dependency startAnimation with linear
- AnimationDataMonitorView (animatable component) conforms to Animatable and depends on startAnimation
Animation Process:
- Click the button to change the value of dependency startAnimation
- SwiftUI immediately completes the change of startAnimation value (the change of dependency value occurs before the animation starts, such as in this example, true will immediately become false)
- SwiftUI finds that AnimationDataMonitorView conforms to the Animatable protocol and uses linear for interpolation calculation
- SwiftUI continuously uses the calculation result of linear to set the animatableData property of AnimationDataMonitorView according to the device’s refresh rate (60 fps/sec or 120 fps/sec), and evaluates and renders the body of AnimationDataMonitorView
By setting print statements in the body, we can see the interpolation data at different time points:

The table showing the changes in the numerical values of the timeline function in the previous text is generated by this code.
Here are some recommended blog posts introducing the usage of Animatable:
When there are multiple mutable dependencies for the animatable element, animatableData should be set to the AnimatablePair type so that SwiftUI can pass animation interpolation data that belongs to different dependencies.
The AnimatablePair type conforms to the VectorArithmetic protocol and requires that the wrapped numerical types also conform to the VectorArithmetic protocol.
The following code demonstrates the usage of AnimatablePair and how to view interpolated data from two different timing curve functions:
struct AnimationDataMonitorView: View, Animatable {
    static var timestamp = Date()
    var number1: Double // will change
    let prefix: String
    var number2: Double // will change

    var animatableData: AnimatablePair<Double, Double> {
        get { AnimatablePair(number1, number2) }
        set {
            number1 = newValue.first
            number2 = newValue.second
        }
    }

    var body: some View {
        let duration = Date().timeIntervalSince(Self.timestamp).formatted(.number.precision(.fractionLength(2)))
        let currentNumber1 = number1.formatted(.number.precision(.fractionLength(2)))
        let currentNumber2 = number2.formatted(.number.precision(.fractionLength(2)))
        let _ = print(duration, currentNumber1, currentNumber2, separator: ",")

        HStack {
            Text(prefix)
                .foregroundColor(.green)
            Text(number1, format: .number.precision(.fractionLength(3)))
                .foregroundColor(.red)
            Text(number2, format: .number.precision(.fractionLength(3)))
                .foregroundColor(.blue)
        }
    }
}

struct Demo: View {
    @State var startNumber1 = false
    @State var startNumber2 = false
    var body: some View {
        VStack {
            AnimationDataMonitorView(
                number1: startNumber1 ? 1 : 0,
                prefix: "Hi:",
                number2: startNumber2 ? 1 : 0
            )
            Button("Animate") {
                AnimationDataMonitorView.timestamp = Date()
                withAnimation(.linear) {
                    startNumber1.toggle()
                }
                withAnimation(.easeInOut) {
                    startNumber2.toggle()
                }
            }
        }
        .frame(width: 300, height: 300)
    }
}

SwiftUI is very intelligent when passing interpolated data, and only passes the dependent variables that have changed to the animatable element through animatableData. For example, in the above code, the parameter prefix does not change, so it will be automatically skipped when synthesizing the AnimatablePair data, only number1 and number2 will be synthesized.
When more parameters need to be passed, the AnimatablePair type can be nested, such as:
AnimatablePair<CGFloat, AnimatablePair<Float, AnimatablePair<Double, CGFloat>>>
// newValue.second.second.first.
Using Transactions for More Precise Control
In SwiftUI, the process of associating a timeline function with a state can be described in the official language as declaring a transaction for the view. Transactions provide a more flexible way of setting curve function types, animation switches, and temporary state flags.
Both the modifier animation and the global function withAnimation are actually shortcuts for declaring a transaction in the view, corresponding internally to transaction and withTransaction, respectively.
For example, withAnimation actually corresponds to:
withAnimation(.easeInOut){
    show.toggle()
}
// Corresponds to
let transaction = Transaction(animation: .easeInOut)
withTransaction(transaction) {
    show.toggle()
}
animation(_ animation: Animation?) is also implemented through Transaction:
// Code from swiftinterface
extension SwiftUI.View {
    @_disfavoredOverload @inlinable public func animation(_ animation: SwiftUI.Animation?) -> some SwiftUI.View {
        return transaction { t in
            if !t.disablesAnimations {
                t.animation = animation
            }
        }
    }
}
The disablesAnimations and isContinuous provided by Transaction can help developers better control animations, for example:
- Dynamically select the associated timeline curve function
Text("Hi")
    .offset(x: animated ? 100 : 0)
    .transaction {
        if position < 0 || position > 100 {
            $0.animation = .easeInOut
        } else {
            $0.animation = .linear
        }
    }
The scope of transaction is the same as that of animation without specifying a specific dependent version, and it does not have the ability to be associated with a specific dependent item.
// It does not mean that only x is associated. Changes in other dependent items within the scope of the transaction will also produce animations.
.transaction {
    if x == 0 {
        $0.animation = .linear
    } else {
        $0.animation = nil
    }
}

// Equivalent to
.animation(x == 0 ? .linear : nil)
- disablesAnimations
struct Demo: View {
    @State var position: CGFloat = 40
    var body: some View {
        VStack {
            Text("Hi")
                .offset(x: position, y: position)
                .animation(.easeInOut, value: position)

            Slider(value: $position, in: 0...150)
            Button("Animate") {
                var transaction = Transaction() // If the timeline curve function is not specified, the original setting will be retained (in this case, easeInOut).
                if position < 100 { transaction.disablesAnimations = true }
                withTransaction(transaction) { // withTransaction can disable the timeline curve function of the original transaction (associated with the animation), but cannot shield the timeline curve function associated with the transaction.
                    position = 0
                }
            }
        }
        .frame(width: 400, height: 500)
    }
}
withTransaction (disablesAnimations is set to disable animation)+animation<V>(_ animation: Animation?, value: V)is a more mature combination.
- isContinuous
struct Demo: View {
    @GestureState var position: CGPoint = .zero
    var body: some View {
        VStack {
            Circle()
                .fill(.orange)
                .frame(width: 30, height: 50)
                .offset(x: position.x, y: position.y)
                .transaction {
                    if $0.isContinuous {
                        $0.animation = nil // Do not set timing function when dragging
                    } else {
                        $0.animation = .easeInOut(duration: 1)
                    }
                }
                .gesture(
                    DragGesture()
                        .updating($position, body: { current, state, transaction in
                            state = .init(x: current.translation.width, y: current.translation.height)
                            transaction.isContinuous = true // Set flag while dragging
                        })
                )
        }
        .frame(width: 400, height: 500)
    }
}

According to the official documentation, some controls like Slider will automatically set isContinuous during dragging, but it doesn’t match the description in reality. However, we can use it to set temporary states in our code.
In addition, in some scenarios, we can use Transaction to get or set animation-related information for things like:
- UIViewRepresentableContext
- AsyncImage
- GestureState
- Binding, etc.
For example, setting Transaction for Binding:
struct Demo: View {
    @State var animated = false
    let animation: Animation?

    var animatedBinding: Binding<Bool> { // Generating Binding type containing specified Transaction
        let transaction = Transaction(animation: animation)
        return $animated.transaction(transaction)
    }

    var body: some View {
        VStack {
            Text("Hi")
                .offset(x: animated ? 100 : 0)

            Toggle("Animated", isOn: animatedBinding) // Automatically generates animation effect when clicked
        }
        .frame(width: 400, height: 500)
    }
}

PlaygroundPage.current.setLiveView(Demo(animation: .easeInOut))

More Notes on Timing Curve Functions and State Relationships
- SwiftUI only uses the declaration of the closest associated timing curve function and dependency for animatable components.
Circle()
    .fill(red ? .red : .blue)
    .animation(.easeInOut(duration: 1), value: red)  // use this
    .animation(.linear(duration: 3), value: red)
- The timing curve function specified in withAnimation (withTransaction) cannot change the associated function in animation.
Circle()
    .fill(red ? .red : .blue)
    .animation(.easeInOut(duration: 1), value: red)  // use this

Button("Change red"){
    withAnimation(.linear(duration:3)){  // maximum scope, meaning far from animatable component
        red.toggle()
    }
}-
Either animation or withAnimation should be chosen.
-
withTransaction can suppress the timing curve function associated with animation
By setting disablesAnimations, the original timing curve function in the transaction can be disabled (cannot be changed), see the previous section for details
-
Adopt an appropriate way to dynamically set the timing curve function
// Method 1, associated with specific dependencies, suitable for only two situations
.animation(red ? .linear : .easeIn , value: red)

// Method 2, can handle more logic, but not associated with specific dependencies
.transaction{
    switch status{
        case .one:
            $0.animation = .linear
        case .two:
            $0.animation = .easeIn
        case .three:
            $0.animation = nil
    }
}

// Method 3, supports complex logic and is associated with specific status
var animation:Animation?{
    // Even if multiple different dependencies appear in the closure, it will not affect the characteristic of animation being only associated with the specified dependency
    switch status{
        case .one:
            $0.animation = .linear
        case .two:
            $0.animation = .easeIn
        case .three:
            $0.animation = nil
    }
}

.animation(animation , value: status)

// Method 4, with a large scope
var animation:Animation?{
    switch status{
        case .one:
            $0.animation = .linear
        case .two:
            $0.animation = .easeIn
        case .three:
            $0.animation = nil
    }
}

withAnimation(animation){
    ...
}

// Method 5, with a large scope
var animation:Animation?{
    switch status{
        case .one:
            $0.animation = .linear
        case .two:
            $0.animation = .easeIn
        case .three:
            $0.animation = nil
    }
}
var transaction = Transaction(animation:animation)
withTransaction(transaction){
    ...
}

// Etc.
Transition
What is Transition
The transition type (AnyTransition) in SwiftUI is a re-packaging of animatable components. When the change of state causes a change in the branch of the view tree, SwiftUI will use its wrapped animatable components to animate the view.
By setting disablesAnimations, the original timing curve function (which cannot be changed) in the transaction can be disabled. See the previous section for details.
Using transitions also requires satisfying the three elements of SwiftUI animation.
struct TransitionDemo: View {
    @State var show = true
    var body: some View {
        VStack {
            Spacer()
            Text("Hello")
            if show {
                Text("World")
                    .transition(.slide) // animatable view (wrapped in)
            }
            Spacer()
            Button(show ? "Hide" : "Show") {
                show.toggle()
            }
        }
        .animation(.easeInOut(duration:3), value: show) // create dependency association, set timing curve function
        .frame(width: 300, height: 300)
    }
}
Therefore, like all SwiftUI animation elements, transitions also support interruptible animations. For example, when the exit animation is in progress, if the show state is restored to true, SwiftUI will retain the current branch state (without recreating the view, see the sample code attached to this article).
Custom Transitions
Implementing custom transitions in SwiftUI is not difficult, unless you need to create cool visual effects. In most cases, you can combine the animatable components provided by SwiftUI.
struct MyTransition: ViewModifier { // The wrapper object for the custom transition needs to conform to the ViewModifier protocol
    let rotation: Angle
    func body(content: Content) -> some View {
        content
            .rotationEffect(rotation) // animatable component
    }
}

extension AnyTransition {
    static var rotation: AnyTransition {
        AnyTransition.modifier(
            active: MyTransition(rotation: .degrees(360)),
            identity: MyTransition(rotation: .zero)
        )
    }
}

struct CustomTransitionDemo: View {
    @State var show = true
    var body: some View {
        VStack {
            VStack {
                Spacer()
                Text("Hello")
                if show {
                    Text("World")
                        .transition(.rotation.combined(with: .opacity))
                }
                Spacer()
            }
            .animation(.easeInOut(duration: 2), value: show) // declare animation here, the text of the Button will not have animation effect
            Button(show ? "Hide" : "Show") {
                show.toggle()
            }
        }
//        .animation(.easeInOut(duration: 2), value: show) // if declared here, the text of the Button will also be affected, resulting in the following image
        .frame(width: 300, height: 300)
        .onChange(of: show) {
            print($0)
        }
    }
}

Although MyTransition does not appear to conform to the Animatable protocol, the rotationEffect within it (which is an animatable ViewModifier) helps us achieve the animation effect.
Additionally, we can also use GeometryEffect (which conforms to both ViewModifier and Animatable) to create complex transition effects.
For more advanced customization of transitions, please refer to Javier’s article, Advanced SwiftUI Transitions.
State, View Identity, and Animation
Since SwiftUI animations create smooth transitions from one state to another, we must have a correct understanding of the potential outcomes resulting from changes to the state (dependencies).
SwiftUI uses two types of identifiers for views: structural identifiers and explicit identifiers. For animations, the considerations for each type of identifier differ slightly.
Structural Identification
The following two code snippets both use structural view identification (identifying by their hierarchical position and type within the view), but their intentions are completely different.
// Code One
if show {
    Text("Hello")  // Branch One
} else {
    Text("Hello")  // Branch Two
      .offset(y : 100)
}

// Code Two
Text("Hello")
    .offset(y : show ? 100 : 0)  // Two states of the same view are declared
Code One describes switching between Branch One and Branch Two in SwiftUI when the dependent variable show changes. In this case, we can set the entrance and exit animations of Branch One and Branch Two separately using transition (or set Transition uniformly outside of the branch selection), but we cannot require Branch One to move above Branch Two.
// Code One
VStack{  // Use Layout Container
    if !show {
        Text("Hello")  // Branch One
           .transition(.scale)
    } else {
        Text("Hello")  // Branch Two
          .offset(y : 100)
          .transition(.move(edge: .bottom))
    }
}
.animation(.easeIn, value: show)

There are two important points to note in the above code:
animationmust be used outside the conditional statement, because only when it is declared outside theif-elsestatement, the scope will be valid for theshowjudgment.- The conditional statement should be wrapped in a layout container (VStack, ZStack, HStack view) (do not use Group). Since both branch views will appear simultaneously during the transition, the transition animation can only be correctly handled in the layout container. Group can only set its child elements uniformly and cannot handle the situation where both branch views appear at the same time (one view branch transition will be lost).
Code 2 describes the different states of the same view when show changes (offset has different y values). Therefore, after being associated with the timing curve function, the view will move from the position of state 1 (y: 0) to the position of state 2 (y: 100).
// Code 2
Text("Hello")
    .offset(y: show ? 100 : 0) // Declare two states of the same view
    .animation(.spring(), value: show)
For information on the structural identification of views, see ViewBuilder Research: Creating a ViewBuilder imitation.
Explicit Identification
In SwiftUI, there are two ways to set explicit identification for views: ForEach and the id modifier.
- Provide a stable and unique KeyPath as the identifier for ForEach.
struct Demo: View {
    @State var items = (0...100).map { $0 }
    var body: some View {
        VStack {
            List {
                ForEach(items, id: \.self) { item in // id: \\.self uses element as the identifier
                    Text("\(item)")
                }
            }
            .animation(.easeInOut, value: items)
            Button("Remove Second") {
                items.remove(at: 1)
            }
            Button("add Second") {  // the same element can appear multiple times in items, breaking the uniqueness of the identifier
                items.insert(Int.random(in: 0...100), at: 1)
            }
        }
        .frame(width: 400, height: 500)
    }
}
items is an array of integers. In the above code, \.self is used as the identifier. This means that when there are two identical elements in the array (when the add button is clicked), SwiftUI will not be able to correctly identify our intention — which element (the same value means the same identifier) we want to operate on. Therefore, there is a high probability of animation abnormalities due to incorrect identification of the view. In the animation below, SwiftUI gives a warning when duplicate elements appear.

Providing a data source with unique identifiers for ForEach can effectively avoid animation abnormalities caused by this.
struct Item: Identifiable, Equatable {
    let id = UUID() // unique identifier
    let number: Int
}

struct Demo: View {
    @State var items = (0...100).map { Item(number: $0) }
    var body: some View {
        VStack {
            List { // Currently unable to specify transition for items in List, another example of poor compatibility with SwiftUI animation in the original control. Switching to ScrollView can support transition for specified items.
                ForEach(items, id: \.id) { item in
                    Text("\(item.number)")
                }
            }
            .animation(.easeInOut, value: items) // The List uses this association to handle animations rather than ForEach.
            Button("Remove Second") {
                items.remove(at: 1)
            }
            Button("add Second") {
                items.insert(Item(number: Int.random(in: 0...100)), at: 1)
            }
        }
        .frame(width: 400, height: 500)
    }
}
- Modifier id needs to use transition.
The id modifier is another way to provide explicit identification for a view. When the value of the id modifier changes, SwiftUI removes the view it applies to from the current view hierarchy and creates a new one that is added to the original view’s position in the hierarchy. Therefore, any animation that affects it is also an AnyTransaction.
struct Demo: View {
    @State var id = UUID()
    var body: some View {
        VStack {
            Spacer()
            Text("Hello \(UUID().uuidString)")
                .id(id) // the original view is removed and a new view is added when the id changes
                .transition(.slide)
                .animation(.easeOut, value: id)
            Button("Update id") {
                id = UUID()
            }
            Spacer()
        }
        .frame(width: 300, height: 300)
    }
}

Currently, SwiftUI’s logic for handling view transitions caused by changes in id values is not very consistent. If you encounter a transition that cannot be activated using animation (such as opacity), you can try using withAnimation.
Regrets and Prospects
In theory, once you have mastered the animation mechanism of SwiftUI, you should be able to easily control the animation with code. However, reality is cruel. As SwiftUI is a young framework, many of its underlying implementations still rely on encapsulating APIs of other frameworks, resulting in disjointed user experiences in many scenarios.
Animation problem with controls
Many of the controls in SwiftUI are implemented by encapsulating UIKit (or AppKit) controls, and the current animation processing is not sufficient.
In the article ViewBuilder Research: Creating a ViewBuilder imitation, we demonstrated how SwiftUI’s Text handles its extension methods. Although UIViewRepresentableContext provides Transaction information for animation control for underlying controls, the official controls in SwiftUI do not respond to this. For example, the following code cannot achieve smooth transitions:
Text("Hello world")
    .foregroundColor(animated ? .red : .blue) // Extensions of controls encapsulated based on UIKit (AppKit) can hardly achieve animation control
    .font(animated ? .callout : .title3)
Although we can solve these problems through some methods, it not only increases the workload but also loses some performance.
Paul Hudson demonstrated how to create smooth transition animations for font size in the article How to animate the size of text.
The following code can help Text achieve smooth transition of text color.
extension View {
    func animatableForeground(_ color: Color) -> some View {
        self
            .overlay(Rectangle().fill(color))
            .mask {
                self
                    .blendMode(.overlay)
            }
    }
}

struct Demo: View {
    @State var animated = false
    var body: some View {
        VStack {
            Button("Animate") {
                animated.toggle()
            }
            Text("Hello world")
                .font(.title)
                .animatableForeground(animated ? .green : .orange)
                .animation(.easeInOut(duration: 1), value: animated)
        }
    }
}
SwiftUI 4.0’s Text provides support for the above scenario through the newly added content transition.
To distinguish it from SwiftUI’s original Transition concept, SwiftUI 4.0 refers to the animation transition inside this control as a content transition. Developers can set the content transition mode using .contentTransition.
// SwiftUI 4.0 (iOS 16+, macOS 13+)
struct ContentTransitionDemo: View {
    @State var change = false
    var body: some View {
        VStack{
            Button("Change"){
                change.toggle()
            }
            .buttonStyle(.bordered)
            Spacer()
            Text("Hello, World!")
                .font(change ? .body : .largeTitle)
                .foregroundStyle( change ? Color.red.gradient : Color.blue.gradient)
                .fontWeight(change ? .thin : .heavy)
                .animation(.easeInOut, value: change)
        }
        .frame(height:100)
    }
}
Enabling content transitions still requires following the three elements of SwiftUI animations, and an easing timing function must be set for the animation.
Text("Hello, World!")
                .font(change ? .body : .largeTitle)
                .foregroundStyle( change ? Color.red.gradient : Color.blue.gradient)
                .fontWeight(change ? .thin : .heavy)
                .animation(.easeInOut, value: change)
                .contentTransition(.opacity)  // Set the content transition mode, the default is interpolate
The currently supported contentTransition modes are:
- interpolate (default)
The demo effect is shown in the above figure. Automatic drawing of interpolation animations is implemented. The logic and effect of implementation are basically equivalent to the custom animation Text mentioned earlier.
- opacity

- identity

Content transition mode can also be set through environmental values:
            Text("Hello, World!")
                .font(change ? .body : .largeTitle)
                .foregroundStyle(change ? Color.red.gradient : Color.blue.gradient)
                .fontWeight(change ? .thin : .heavy)
                .animation(.easeInOut, value: change)
                .environment(\.contentTransition, .opacity)  // Set using environmental value
                .environment(\.contentTransitionAddsDrawingGroup, true) // Enable GPU acceleration
If you want your custom component (a wrapper for UIKit or AppKit components) to also support content transition, you need to check the environmental value settings in the definition, for example:
struct CustomComponent: UIViewRepresentable {
    @Environment(\.contentTransition) var contentTransition
    @Environment(\.contentTransitionAddsDrawingGroup) var drawingGroup // Whether to enable GPU accelerated rendering mode

    func makeUIView(context: Context) -> some UIView {
        switch contentTransition {
        case .opacity:
            break
        case .identity:
            break
        case .interpolate:
            break
        default:
            break
        }

        if drawingGroup {

        }
        return UIView()
    }

    func updateUIView(_ uiView: UIViewType, context: Context) {}
}
All components that use Text explicitly or implicitly can benefit from content transition, for example:
Button("Click Me") {}
          .font(change ? .body : .largeTitle)
          .foregroundStyle(change ? Color.red.gradient : Color.blue.gradient)
          .fontWeight(change ? .thin : .heavy)
          .animation(.easeInOut, value: change)
Animation issues with controllers
Compared to widget animations, animation issues with controllers are even harder to solve. NavigationView, TabView, Sheet, and other components have no native animation control solutions, and even when calling UIKit (AppKit) code, only minor adjustments can be made to the animations (such as controlling animation start). Both the means and effects are far behind SwiftUI’s native animation capabilities.
It is urgent to hope that SwiftUI can make breakthroughs in this area. In addition to making animation logic more SwiftUI-like, it would be best to use AnyTransition for controller transition settings.
Animation performance issues
It is almost inevitable that reactive animations respond slightly less than imperative animations. SwiftUI has made some efforts to optimize animation performance (such as Canvas, drawingGroup). It is hoped that with continuous code optimization and hardware improvements, the perception of this gap will become smaller and smaller.
Summary
- Animation is a smooth transition from one state to another.
- Three elements are required to declare an animation.
- Master the results of changes in state - whether it’s different states of the same view or different view branches.
- The more precise the relationship between the timing function and its dependencies, the less likely it is to produce abnormal animations.
- Unique and stable view identifiers (whether structural or explicit) help to avoid animation abnormalities.
The animation mechanism designed by SwiftUI is still quite excellent, and I believe that as the completeness continues to improve, developers can achieve better interaction effects with less code.