Having excellent interaction effects and touch is a principle that many iOS developers have adhered to for a long time. The response performance of the same code may vary greatly under different data levels. This article will demonstrate the approach to finding and solving problems in SwiftUI through an optimized list view case, which also involves explicit identification of SwiftUI views, dynamic setting of @FetchRequest, List operating mechanism, and other contents. The examples in this article need to be run on iOS 15 or above, and the technical features are based on SwiftUI 3.0+.
First, create a hypothetical requirement:
- A view that can display tens of thousands of records
- There should be no obvious delay when entering this view from the previous view
- Users can easily navigate to the top or bottom of the data without any response delay
The data scenario in this article is fictional. In actual processing, similar situations are usually avoided. This article mainly aims to demonstrate the approach to finding and solving problems through an extreme example.
Sluggish List View Response
To achieve the above requirement, the following steps are usually considered:
- Create a data set
- Display the data set through List
- Wrap the List with ScrollViewReader
- Add an ID identifier to the items in the List for locating
- Scroll to the specified position (top or bottom) with scrollTo
The following code is implemented according to this idea:
struct ContentView: View {
    var body: some View {
        NavigationView {
            List {
                // Enter the list view through a NavigationView
                NavigationLink("List view with 40000 data items", destination: ListEachRowHasID())
            }
        }
    }
}

struct ListEachRowHasID: View {
    // The data is created through CoreData. 40000 demo data items have been created. The structure of Item is very simple and has a very small capacity.
    @FetchRequest(
        sortDescriptors: [NSSortDescriptor(keyPath: \Item.timestamp, ascending: true)],
        animation: .default
    )
    private var items: FetchedResults<Item>

    var body: some View {
        ScrollViewReader { proxy in
            VStack {
                HStack {
                    Button("Top") {
                        withAnimation {
                            // Scroll to the top record of the list
                            proxy.scrollTo(items.first?.objectID, anchor: .center)
                        }
                    }.buttonStyle(.bordered)
                    Button("Bottom") {
                        withAnimation {
                            // Scroll to the bottom record of the list
                            proxy.scrollTo(items.last?.objectID)
                        }
                    }.buttonStyle(.bordered)
                }
                List {
                    ForEach(items) { item in
                        ItemRow(item: item)
                            // Set the identifier for each row of record view
                            .id(item.objectID)
                    }
                }
            }
        }
    }
}

struct ItemRow: View {
    let item: Item
    var body: some View {
        Text(item.timestamp, format: .dateTime)
            .frame(minHeight: 40)
    }
}
// Satisfy the Identifiable requirement of ForEach
extension Item: Identifiable {}
The complete source code in this article can be obtained here
When there are only a few hundred records, the above code runs very well, but after creating 40000 demo data items, the responsiveness of the view is as follows:

There is a noticeable lag (over 1 second) when entering the view. However, scrolling the list is smooth and responds without delay when scrolling to the top or bottom of the list.
Identifying the Problem
Some may think that there is a certain amount of delay when entering a list view due to the large amount of data. However, even in today’s SwiftUI performance, we can still achieve a much smoother transition into a list view that is several times the size of the current data.
Given that the lag occurs when entering the view, we can focus on the following areas to identify the problem:
- Core Data performance (IO or lazy loading)
- Initialization or body evaluation of the list view
- List performance
Performance of Core Data
@FetchRequest is the SwiftUI wrapper of NSFetchedResultsController. It automatically responds to data changes and refreshes views based on the specified NSFetchRequest. The NSFetchRequest corresponding to the code above is as follows:
@FetchRequest(
        sortDescriptors: [NSSortDescriptor(keyPath: \Item.timestamp, ascending: true)],
        animation: .default
    )
private var items: FetchedResults<Item>

// Equivalent NSFetchRequest
extension Item {
    static var fetchRequest:NSFetchRequest<Item> {
        let fetchRequest = NSFetchRequest<Item>(entityName: "Item")
        fetchRequest.sortDescriptors = [NSSortDescriptor(keyPath: \Item.timestamp, ascending: true)]
        return fetchRequest
    }
}

// Equivalent to
@FetchRequest(fetchRequest: Item.fetchRequest, animation: .default)
var items:FetchedResults<Item>
At this point, returnsObjectsAsFaults of fetchRequest is set to the default value false (managed objects are in a lazy state), and fetchBatchSize is not set (all data is loaded into the persistent store’s row cache).
Using Instruments, it was found that even with an unoptimized fetchRequest, it only takes around 11ms to load 40000 records from the database into the persistent store’s row cache.
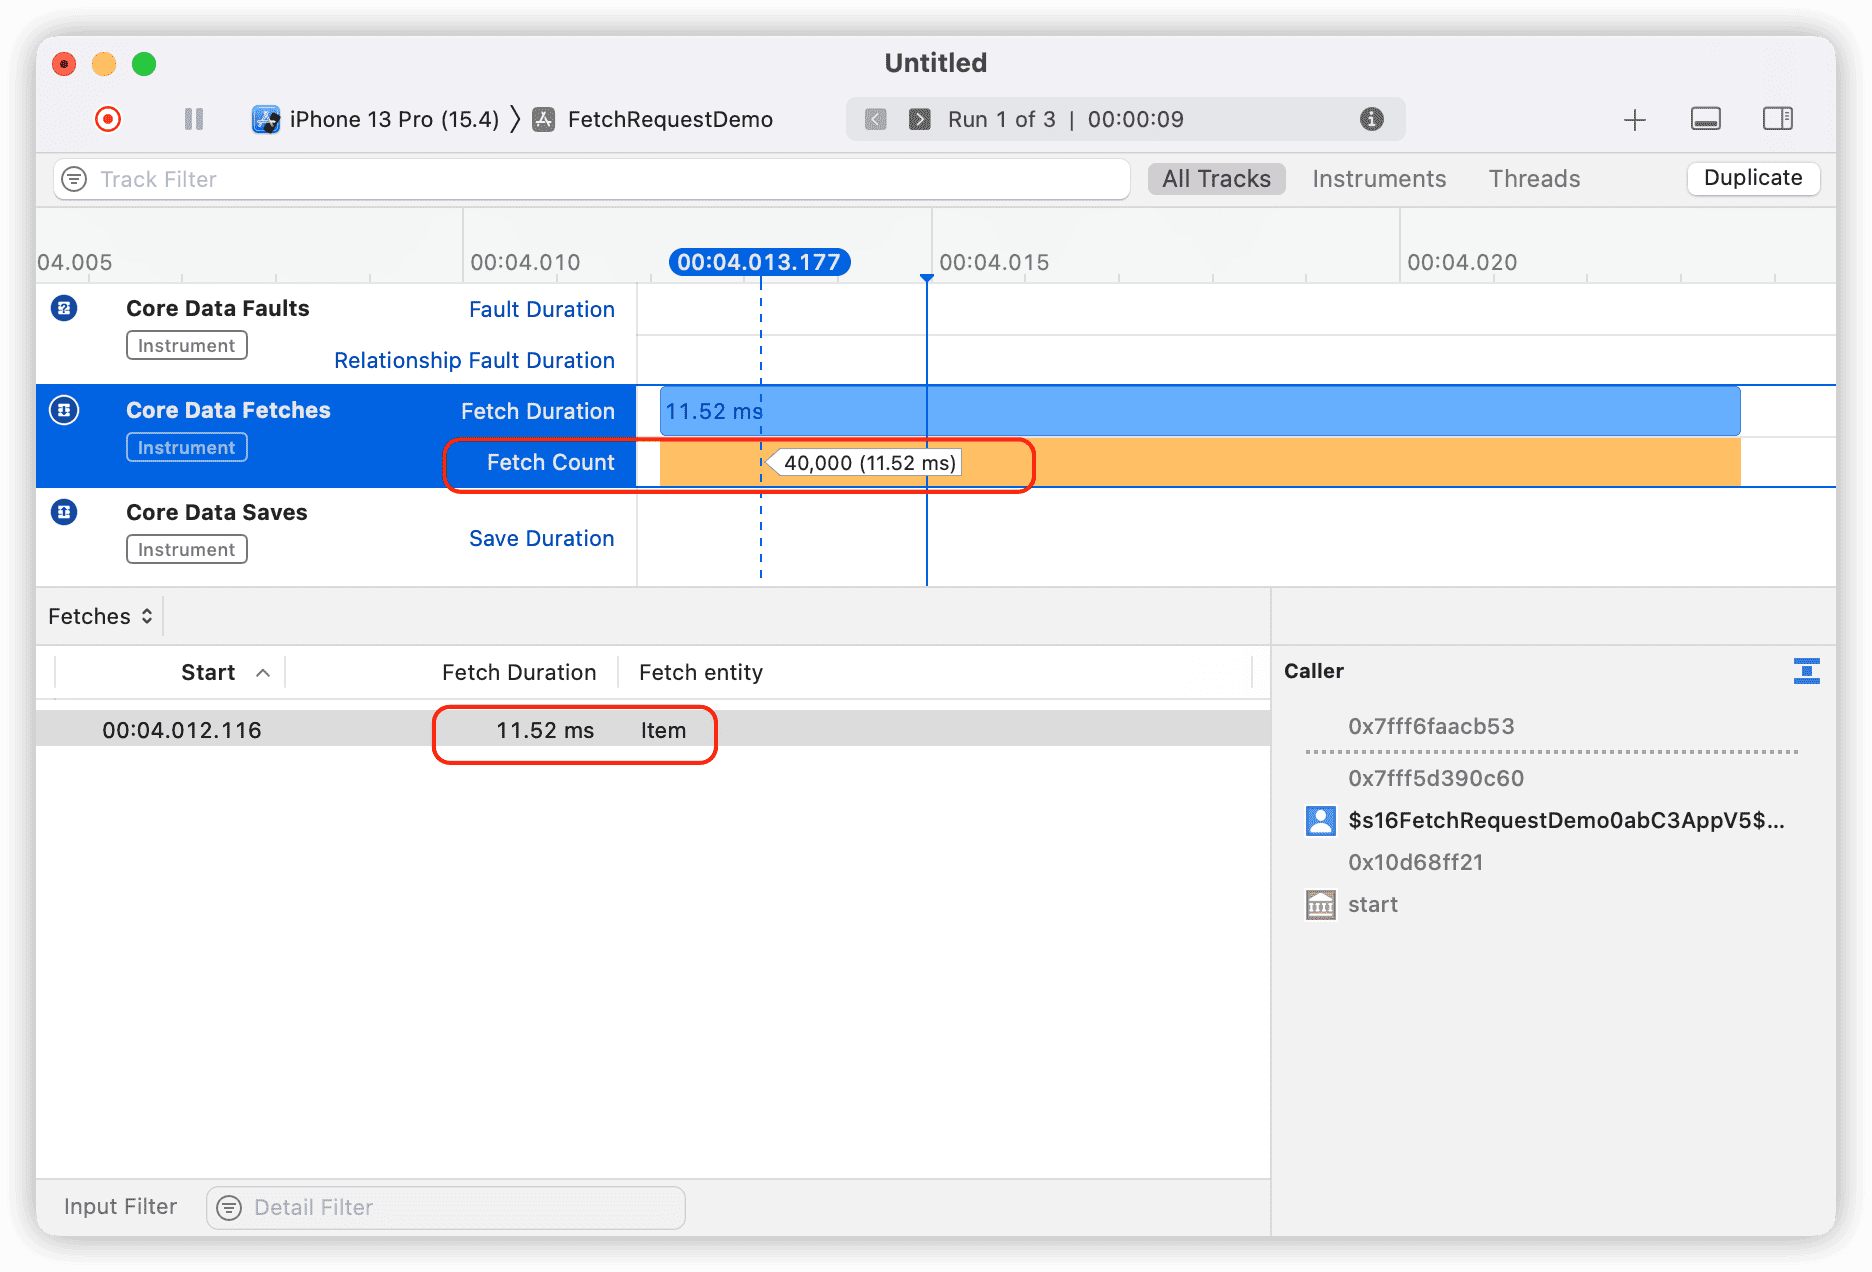
Additionally, through the following code, it can also be seen that only around 10 managed objects (data required for displaying screen height) have been lazily initialized:
func info() -> some View {
    let faultCount = items.filter { $0.isFault }.count
    return VStack {
        Text("item's count: \(items.count)")
        Text("fault item's count : \(faultCount)")
    }
}
Therefore, it can be ruled out that the lag is caused by Core Data.
Initialization of the List View and Evaluation of the Body
If you have some understanding of SwiftUI’s NavigationView, you should know that SwiftUI pre-instantiates the target view of NavigationLink (but does not evaluate the body). That is, when the main menu is displayed, the list view has already completed the instantiation (which can be verified by adding print commands in the constructor of ListEachRowHasID), so it should not be delayed by instantiating the list view.
By checking the time consumed by the evaluation of the body of ListEachRowHasID, no efficiency issues were found.
    var body: some View {
        let start = Date()
        ScrollViewReader { proxy in
            VStack {
              ....
            }
        }
        let _ = print(Date().timeIntervalSince(start))
    }
// 0.0004889965057373047
Currently, it can be basically ruled out that the performance problems come from factors such as IO, database, and list view instantiation, etc. It is highly likely that they originate from SwiftUI’s internal processing mechanism.
Efficiency of List
As a encapsulation of UITableView (NSTableView) in SwiftUI(Starting from SwiftUI 4, it has switched to UICollectionView. ), List’s performance is generally satisfactory in most cases. In the article ”Lifecycle of SwiftUI Views”, I introduced how List optimizes the display of subviews to some extent. According to normal logic, when entering the ListEachRowHasID list view, the List should only instantiate a dozen or so ItemRow subviews (according to the display needs of the screen). Even when using scrollTo to scroll to the bottom of the list, List will optimize the display process during the scrolling, and at most instantiate more than 100 ItemRow during the scrolling process.
We made some modifications to ItemRow to verify the above assumptions:
struct ItemRow:View{
    static var count = 0
    let item:Item
    init(item:Item){
        self.item = item
        Self.count += 1
        print(Self.count)
    }
    var body: some View{
//        let _ = print("get body value")
        Text(item.timestamp, format: .dateTime)
            .frame(minHeight:40)
    }
}
After restarting and re-entering the list view, we surprisingly obtained the following results:
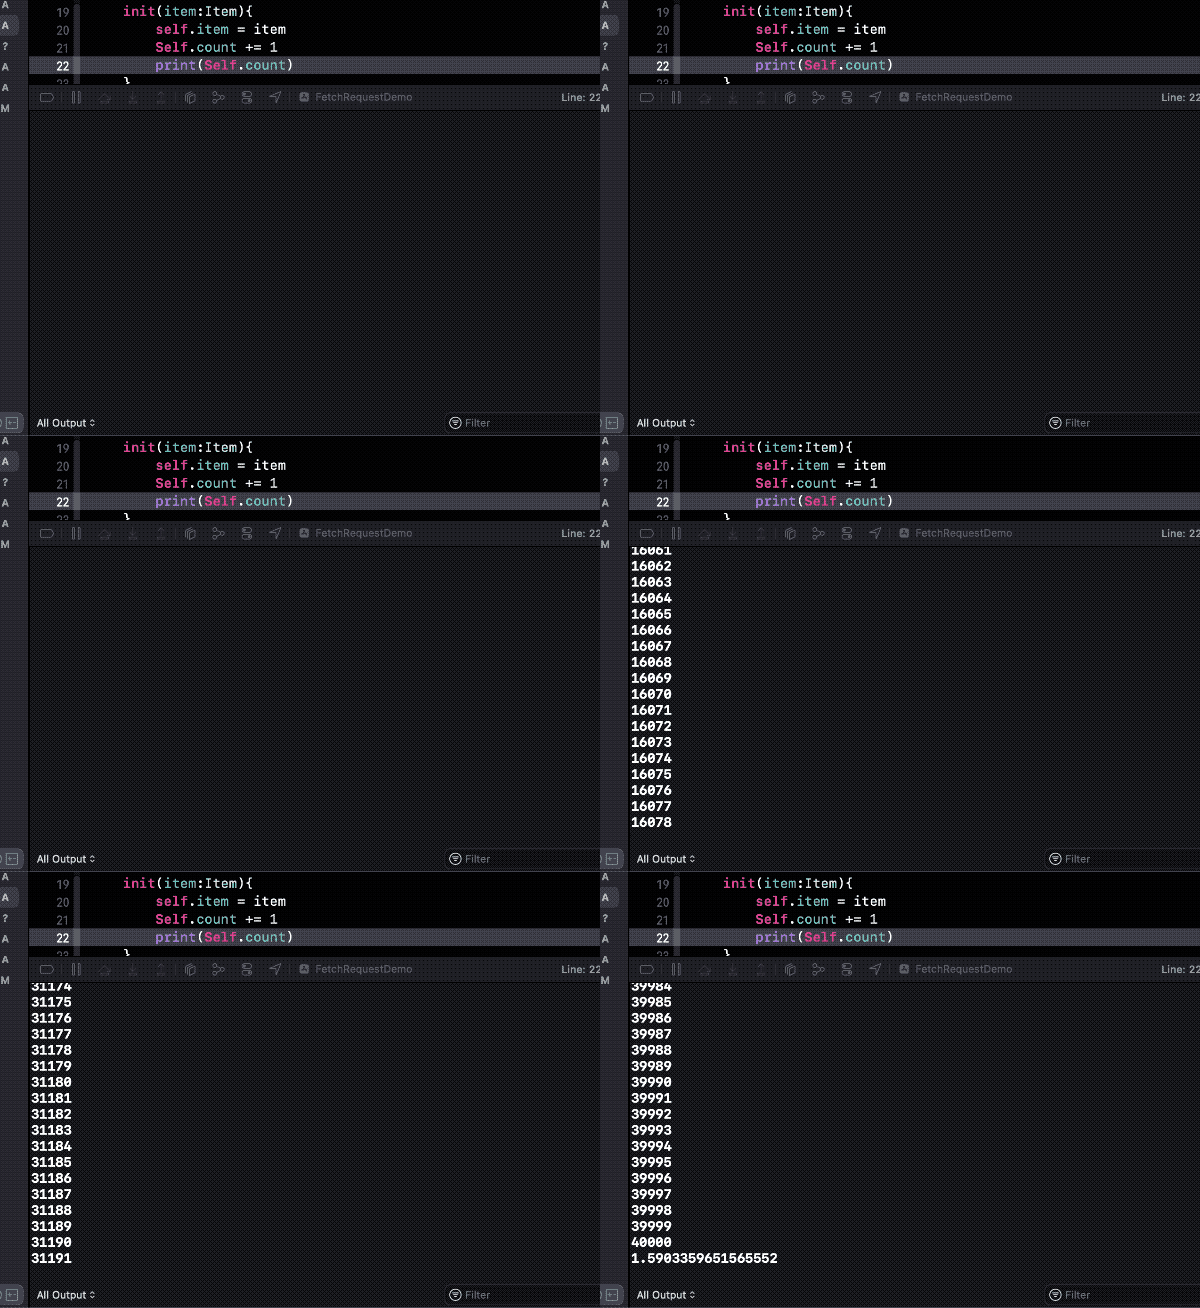
List instantiated views for all data itemRows, totaling 40,000. This is a stark contrast to the previous prediction of only instantiating 10-20 child views. What affected List’s optimization logic for views?
After further eliminating the influence of ScrollViewReader, all signs indicate that the id modifier used to locate scrollTo may be the culprit behind the delay.
After commenting out .id(item.objectID), the lag when entering the list view immediately disappeared, and the number of child views instantiated by List was completely consistent with our initial prediction.
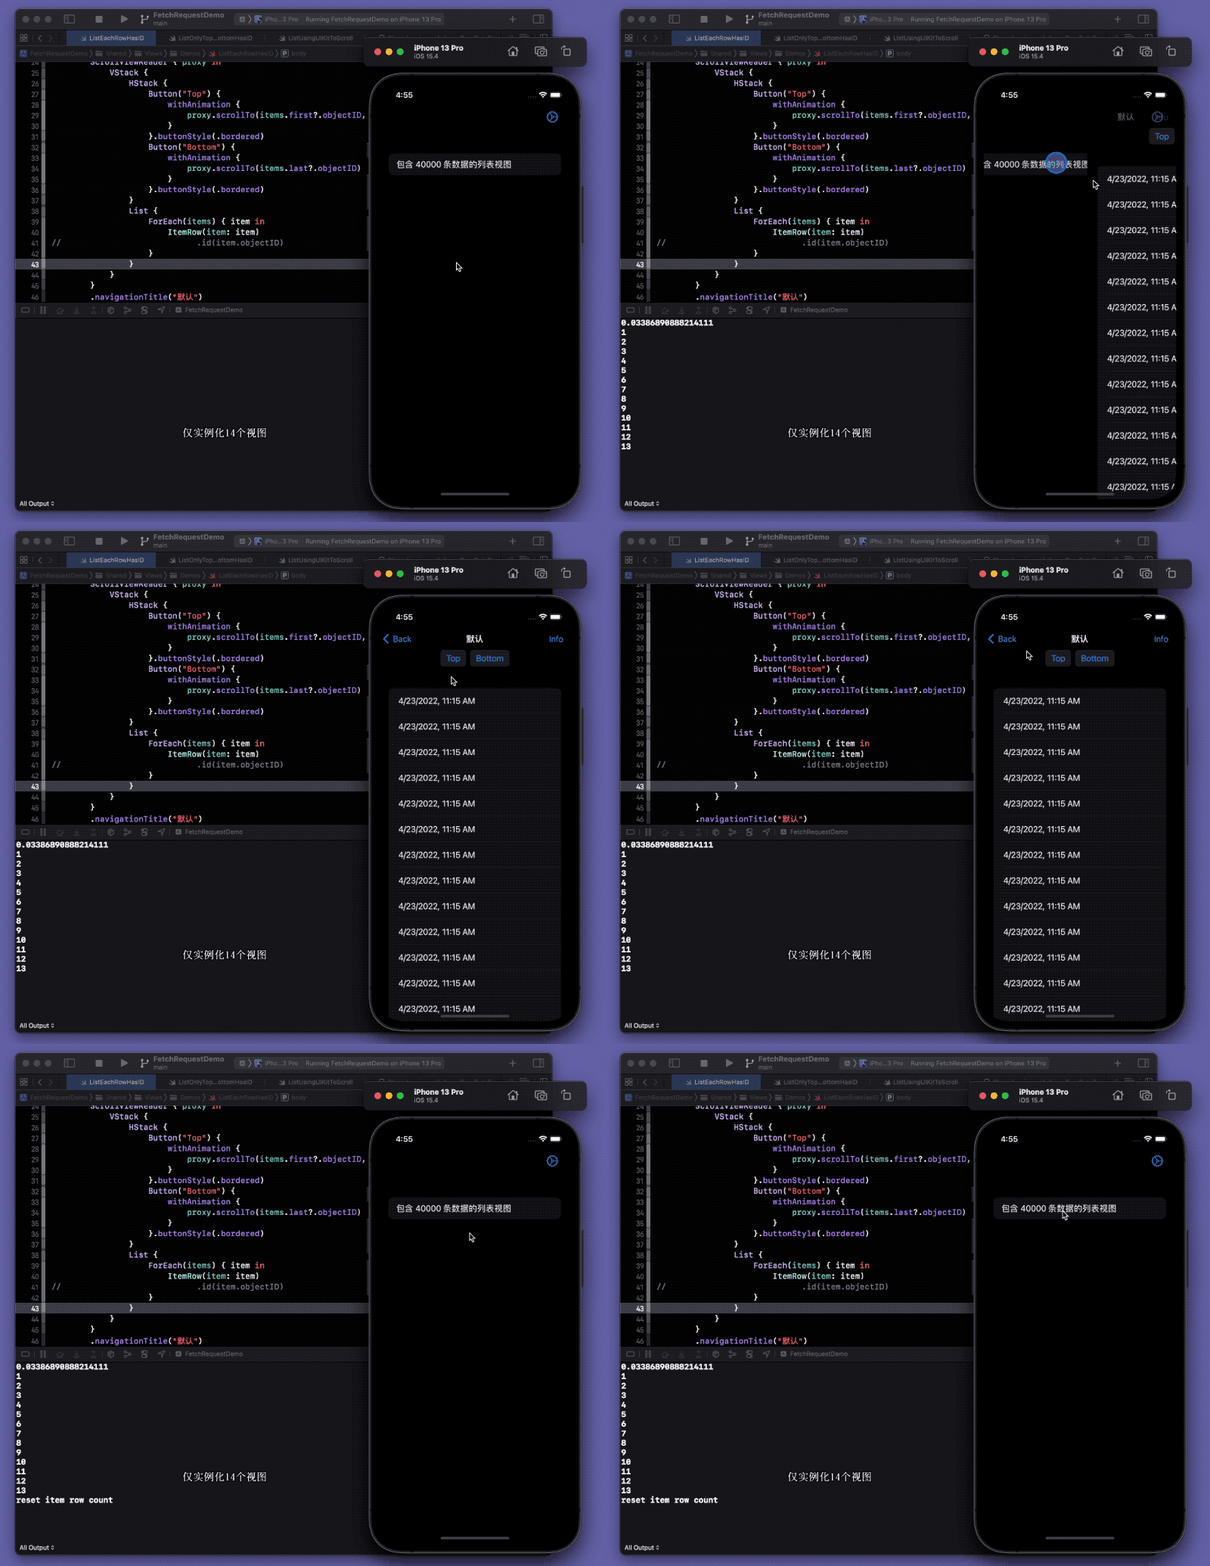
There are two questions before us now:
- Why do views with the id modifier get instantiated early?
- Without using
.id(item.objectID), what other methods do we have to position items at both ends of a list?
id Modifier and Explicit Identity of Views
To understand why views with the id modifier are instantiated early, we first need to understand the purpose of the id modifier.
Identity is the means by which SwiftUI identifies the same or different elements in your program in multiple updates, and it is key to SwiftUI’s understanding of your app. Identity provides a solid anchor for values of views that change over time and should be stable and unique.
In SwiftUI application code, most view identities are achieved through structural identification (see ViewBuilder Research: Creating a ViewBuilder imitation for more information) - by distinguishing views through their type and specific position in the view hierarchy (the view tree). However, in some cases, we need to use explicit identification to help SwiftUI recognize views.
Currently, there are two ways to set explicit identities for views in SwiftUI:
- Specify in the constructor of ForEach
Since the number of views in ForEach is dynamic and generated at runtime, it is necessary to specify a KeyPath that can be used to identify child views in the constructor of ForEach. In our current example, by declaring Item as conforming to the Identifiable protocol, ForEach defaults to specifying it.
extension Item: Identifiable {}
// NSManagedObject is a subclass of NSObject. NSObject provides a default implementation for Identifiable
ForEach(items) { item in ... }
// Equivalent to
ForEach(items, id:\.id) { item in ... }- Specify with the id modifier
The id modifier is another way to explicitly identify views. With it, developers can use any value that conforms to the Hashable protocol to set an explicit identity for a view. The scrollTo method of ScrollViewProxy uses this value to find the corresponding view. Additionally, if the id identifier value changes, SwiftUI will discard the original view (terminate its lifecycle and reset its state) and recreate a new view.
When only specifying display identifiers through ForEach, List optimizes the display of these views by only instantiating them when needed. However, once an id modifier is added to these child views, they will not be able to enjoy the optimization capabilities provided by List (List only optimizes the contents of ForEach).
The id modifier is used to track, manage, and cache explicitly identified views through IDViewList. It is completely different from the identification processing mechanism of ForEach. Using the id modifier is equivalent to splitting these views out of ForEach, thus losing the optimization conditions.
In summary, when dealing with large amounts of data, it is recommended to avoid using the id modifier on child views in ForEach within List.
Although we have found the cause of the lag when entering the list view, how can we use scrollTo to scroll to the endpoint of the list without affecting efficiency?
Solution 1
Starting from iOS 15, SwiftUI has added more customization options for List, especially unblocking the setting of the list row separator and adding an official implementation. We can solve the problem of scrolling to a specific position using scrollTo by setting explicit identifiers for the list endpoints outside of ForEach.
Make the following modifications to ListEachRowHasID:
struct ListEachRowHasID: View {
    @FetchRequest(
        sortDescriptors: [NSSortDescriptor(keyPath: \Item.timestamp, ascending: true)],
        animation: .default
    )
    private var items: FetchedResults<Item>

    @FetchRequest(fetchRequest: Item.fetchRequest1, animation: .default)
    var items1:FetchedResults<Item>

    init(){
        print("init")
    }

    var body: some View {
        ScrollViewReader { proxy in
            VStack {
                HStack {
                    Button("Top") {
                        withAnimation {
                            proxy.scrollTo("top", anchor: .center)
                        }
                    }.buttonStyle(.bordered)
                    Button("Bottom") {
                        withAnimation {
                            proxy.scrollTo("bottom")
                        }
                    }.buttonStyle(.bordered)
                }
                List {
                    // Views in List that are not in ForEach do not enjoy optimization and are instantiated in advance regardless of whether they are displayed or not
                    TopCell()
                        .id("top")
                        // Hide the list row separator for the endpoints
                        .listRowSeparator(.hidden)
                    ForEach(items) { item in
                        ItemRow(item: item)
                    }
                    BottomCell()
                        .id("bottom")
                        .listRowSeparator(.hidden)
                }
                // Set the minimum row height and hide the views at both ends of the list
                .environment(\.defaultMinListRowHeight, 0)
            }
        }
    }
}

struct TopCell: View {
    init() { print("top cell init") }
    var body: some View {
        Text("Top")
            .frame(width: 0, height: 0) // Hide the views at both ends
    }
}

struct BottomCell: View {
    init() { print("bottom cell init") }  // Only the views at both ends will be instantiated in advance, and other views will be instantiated only when needed
    var body: some View {
        Text("Bottom")
            .frame(width: 0, height: 0)
    }
}
The result of running the modified code is as follows:
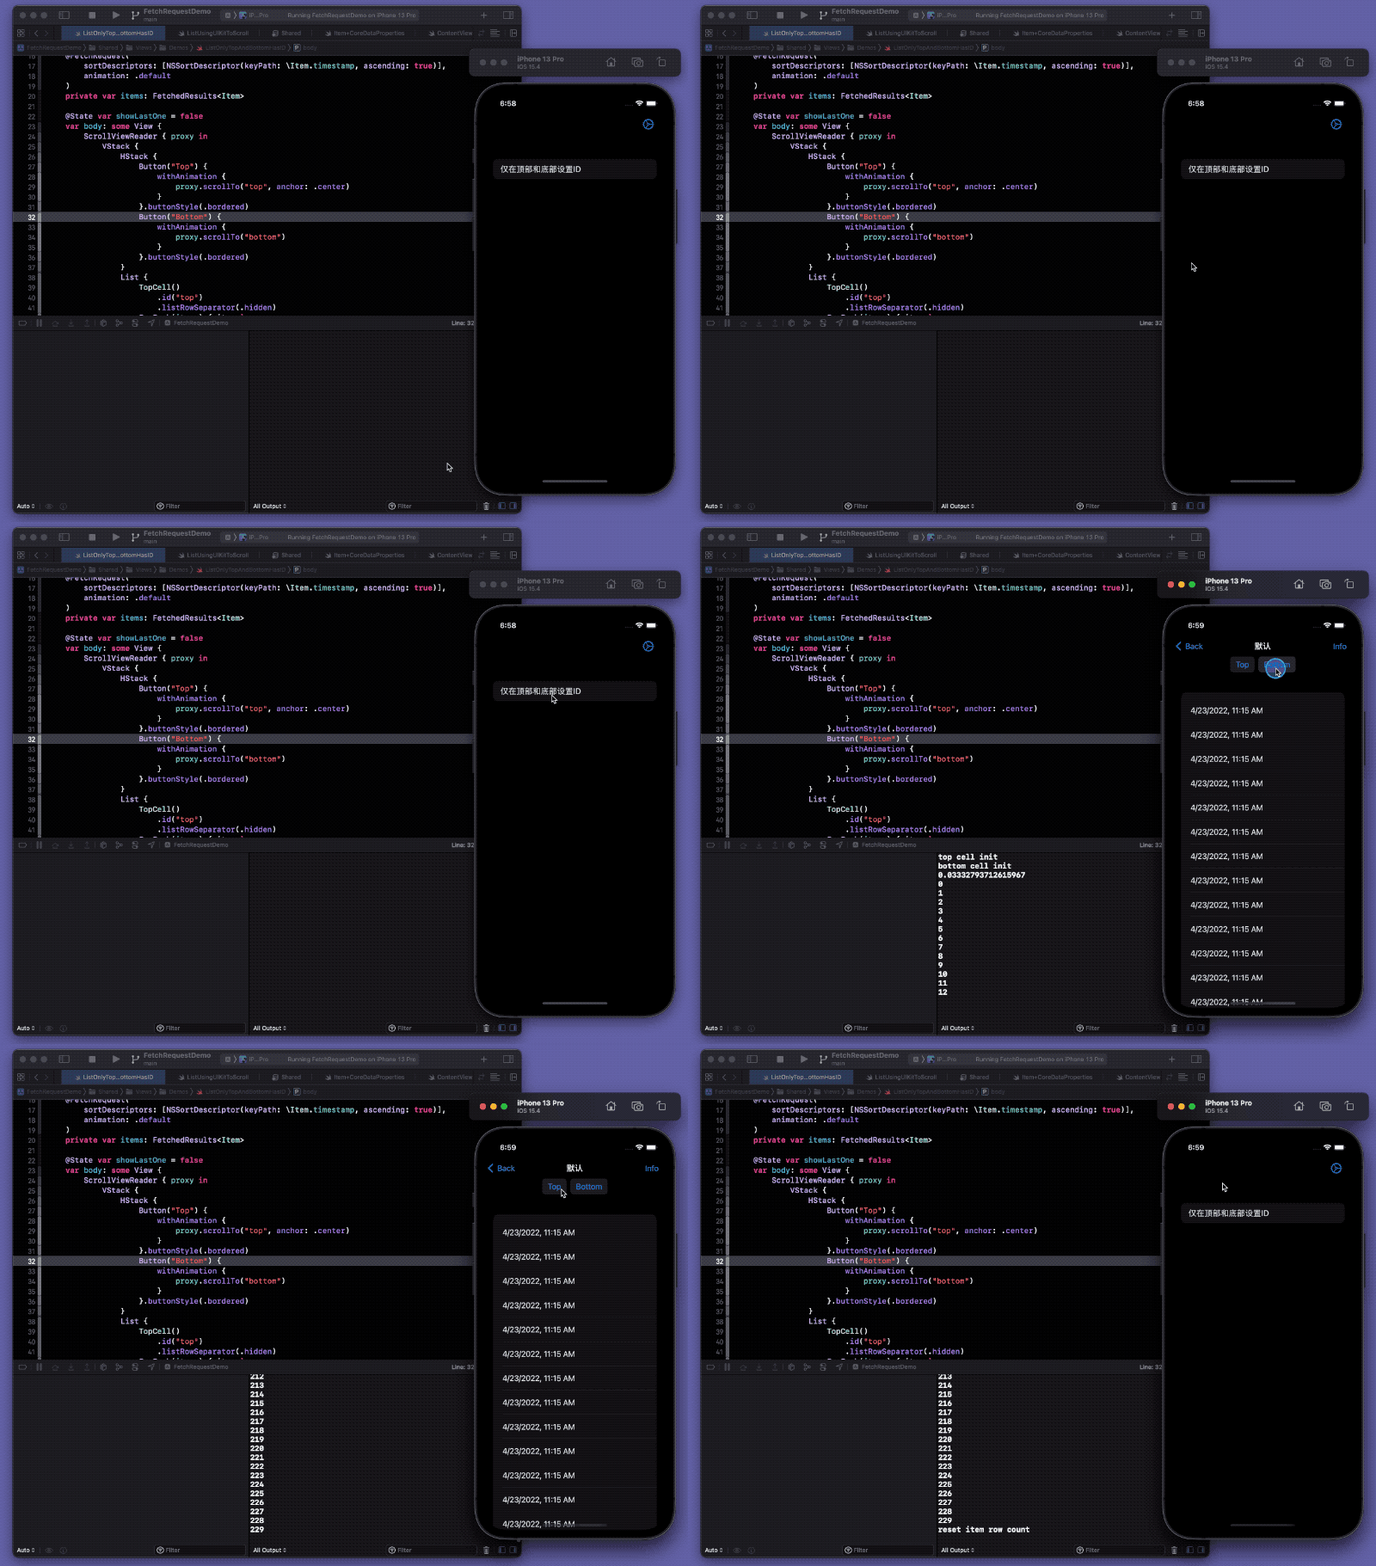
Currently, we can quickly enter the list view and implement scrolling to a specific position using scrollTo.
As the id modifier is not a lazy modifier, we cannot use it exclusively for the header and footer data of the list in ForEach. If you try to add the id modifier using conditional statements, it will further degrade performance (you can find the reason in ViewBuilder Study (Part II) - Learning from Imitation). The sample code also provides this implementation method for comparison.
New Issue
Observant friends may have noticed that after running the code for solution one, there is a high probability of delay when clicking the bottom button for the first time (it does not immediately start scrolling).
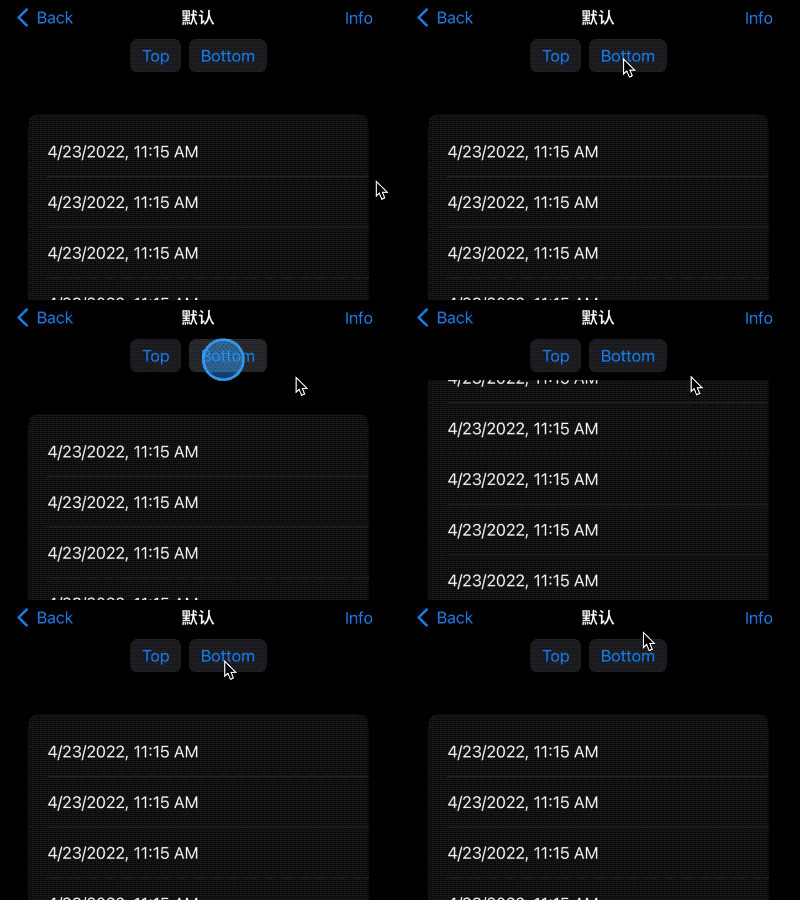
From the print information in the console, it can be inferred that List optimizes the scrolling process when scrolling to a specified position using scrollTo. By deceiving the visual perception, only a small number of child views need to be instantiated to complete the scrolling animation (consistent with the initial expectation), thereby improving efficiency.
Since only about 100 child views were instantiated and drawn throughout the entire scrolling process, the pressure on the system was not significant. Therefore, after repeated testing, the problem of delayed scrolling when clicking the bottom button for the first time is most likely caused by a bug in the current ScrollViewProxy.
Solution 2
After recognizing the abnormal behavior of ScrollViewProxy and the use of id modifier in ForEach, we have to try to achieve a more perfect effect by calling the underlying method.
Unless there is no other choice, I do not recommend wrapping UIKit (AppKit) controls, but supplement and improve SwiftUI’s native controls in the least intrusive way possible.
We will use SwiftUI-Introspect to scroll to both ends of the list in List.
import Introspect
import SwiftUI
import UIKit

struct ListUsingUIKitToScroll: View {
    @FetchRequest(
        sortDescriptors: [NSSortDescriptor(keyPath: \Item.timestamp, ascending: true)],
        animation: .default
    )
    private var items: FetchedResults<Item>
    @State var tableView: UITableView?
    var body: some View {
        VStack {
            HStack {
                Button("Top") {
                    // Use the scrollToRow method of UITableView instead of the scrollTo method of ScrollViewReader
                    self.tableView?.scrollToRow(at: IndexPath(item: 0, section: 0), at: .middle, animated: true)
                }.buttonStyle(.bordered)
                Button("Bottom") {
                    self.tableView?.scrollToRow(at: IndexPath(item: items.count - 1, section: 0), at: .bottom, animated: true)
                }.buttonStyle(.bordered)
            }
            List {
                // No need to use id modifier for identification and positioning
                ForEach(items) { item in
                    ItemRow(item: item)
                }
            }
            .introspectTableView(customize: {
                // Get the corresponding UITableView instance of List
                self.tableView = $0
            })
        }
    }
}
Thus, we have achieved a delay-free entry into the list view, and there is no delay when scrolling to the bottom of the list for the first time.
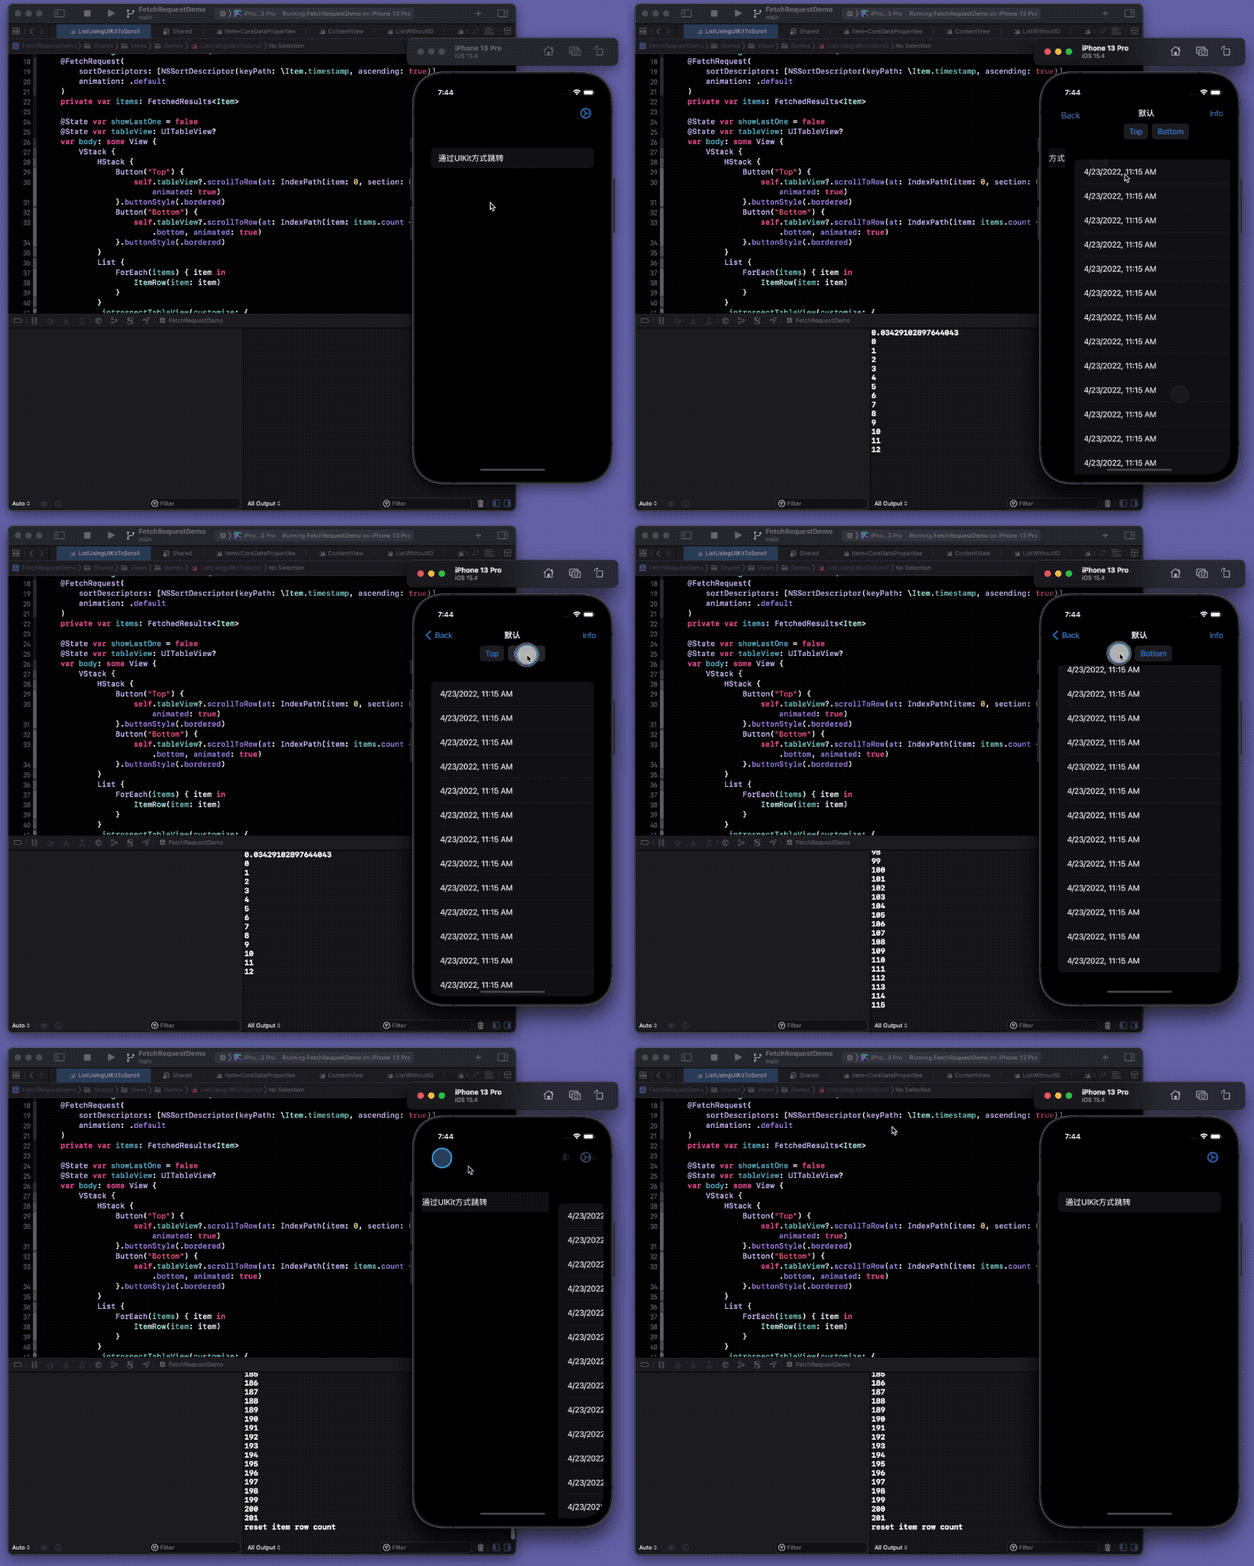
I hope that SwiftUI can improve the performance issues in future versions so that good effects can be achieved without using non-native methods.
The sample code also provides an example of using @SectionedFetchRequest and section for positioning.
Handling in Production
This article demonstrates the abnormal conditions of the id modifier in ForEach, as well as problem-solving strategies. However, the example used is almost impossible to be used in a production environment. In actual development, when dealing with large amounts of data in a list, there are several solutions available (using Core Data as an example):
Data Pagination
Dividing data into multiple pages is a common method for handling large datasets, and Core Data provides sufficient support for this.
fetchRequest.fetchBatchSize = 50
fetchRequest.returnsObjectsAsFaults = true // If the number of data in each page is small, we can directly use lazy loading to further improve efficiency.
fetchRequest.fetchLimit = 50 // The amount of data required per page.
fetchRequest.fetchOffset = 0 // Change page by page. count * pageNumber
By using similar code as above, we can obtain the required data page by page, greatly reducing the burden on the system.
Switching between ascending and descending order
The data is displayed in descending order and users are only allowed to manually scroll through the list. This method is used in applications such as email and memos.
Since the speed at which users scroll through the list is not very fast, the pressure on the List is not great, and the system has enough time to construct the view.
For Lists with complex subviews (with inconsistent dimensions and mixed graphics and text) and large amounts of data, any large-scale scrolling (such as scrolling directly to the bottom of the list) will place tremendous layout pressure on the List, and there is a considerable probability of scrolling failure. If users must be provided with a way to directly access data at both ends, dynamically switching SortDescriptors may be a better choice.
@FetchRequest(
        sortDescriptors: [NSSortDescriptor(keyPath: \Item.timestamp, ascending: true)],
        animation: .default
    )
private var items: FetchedResults<Item>

// Switching SortDescriptors in the view
$items.wrappedValue.sortDescriptors = [SortDescriptor(\Item.timestamp,order: .reverse)]
Incremental Reading
Communication software (such as WeChat) often shows only the most recent data at the beginning, and uses incremental data retrieval when scrolling upward to reduce system pressure.
- Use an array to hold data instead of dynamic management methods like @FetchRequest or NSFetchResultController.
- Use NSPredicate, NSSortDescription, and
fetchRequest.fetchLimitto obtain a certain number of newest data, and add them to the array in reverse order. - Move to the bottom of the list first (without animation) after displaying the list.
- Use refreshable to call for the next batch of data and continue adding them to the array in reverse order.
With similar approaches, it is also possible to implement incremental reading downwards or incremental reading from both ends.
In the demo project ”Movie Hunter” in the article ”Building Adaptable SwiftUI Applications for Multiple Platforms”, I demonstrated another way to achieve incremental reading by creating a type that conforms to the ”RandomAccessCollection” protocol.
Inverted List
If you want to create a list view that starts scrolling directly from the bottom (similar to some IM apps), you can consider the approach shown in Swiftcord. By flipping the LazyVStack and its subviews, and by reading the data in reverse order, the amount of data retrieval can be reduced.
Conclusion
Compared to UIKit, SwiftUI, which has been released for 4 years, still has many shortcomings. However, looking back at the initial version, we can now achieve many functions that were previously unimaginable. We look forward to more good news from WWDC in June.